Basic Life Support - BLS Certification Class
 Welcome to our Basic Life Support – BLS Certification Class
We will learn about Bloodborne Pathogens, Cardiopulmonary Resuscitation (CPR), Automated External Defibrillation (AED) and First Aid. Whether you’ll need this class as a Healthcare Provider, for your workplace or if you’re just interested in learning—you’ll find everything you’ll need.
The CDC (Center for Disease Control) has issued information stating that the most common cause of death in the United States is cardiovascular disease.
The risk of heart disease can be dramatically increased for patients who are obese, those who are inactive, people with high levels of stress in their lives, high levels of cholesterol, high blood pressure and smoking. These factors are all avoidable, but there are also factors which patients cannot control which can contribute to an increased risk of heart disease. These factors include a patient’s age, sex, genes and whether or not the patient suffers from diabetes of either type.
Heart disease can cause the heart to stop, and restarting the heart in good time can save the patient’s life and allow them to seek life-prolonging treatment. When a patient’s heart stops, the patient is likely to die within 10 minutes as the oxygen supply to the brain is cut off. Between six and 10 minutes after the heart stops, irreversible brain damage is likely to occur. Between four and six minutes after the patient’s heart stops, brain damage is still a possibility, but the brain can survive between zero and four minutes without oxygen with very little risk of permanent brain damage.
Good Samaritan Law

A version of the Good Samaritan Law exists in most countries. It was put in place in order to protect anyone who offers emergency assistance to someone in need.
As long as the ‘samaritan’ is acting voluntarily without expecting to be compensated or paid for their services, they will receive legal protection when assisting someone who is ill, has suffered an injury or is immediate danger for whatever reason. This includes offering legal protection to those who perform CPR in order to preserve life. This means that if the patient is injured in the process of you assisting them, you should not be prosecuted for having harmed them if you were doing your best to save their life.
Understanding Duty to Act
Duty to act is the duty requiring a person to take necessary action in order to prevent harm to another person or to the general public. Whether you are required to follow through depends on the situation and the relationship between the parties. In some cases, breach of duty may put a party at liability for damages.
For laypersons, duty to act requires that you provide care if you have a legal duty. If you do not have a legal duty to provide care, you are not required to provide it.
Fear of providing care
There are a number of factors to weigh up when considering providing care. COVID-19 is an important concern, but the risk of contracting diseases can be reduced by wearing personal protective devices like masks, gloves, and gowns that limit exposure.
If you feel fear of providing care due to possible legal issues, know that rescuers who provide care without a legal duty and act in good faith are protected by Good Samaritan laws.
If the situation is actively unsafe, do not attempt care. If you or the victim are at risk, it is best to call EMS and wait for support to arrive.
In some cases, you may be unable to save a victim. Rescuers should still attempt to provide the best care they are able to. A victim’s chances of survival can be improved by even basic efforts at life support. In accidents, victims who are clinically dead may still be helped when given care. Rescue efforts will not worsen their condition.
Following a traumatic situation in which you provided care, you may experience overwhelming emotions. If you continue to feel symptoms like depression, be sure to seek help from a professional source.
Prior to Performing CPR
Prior to performing CPR, make sure the victim isn’t in danger and that you won’t be putting yourself in danger by rescuing them. An example of this is someone who is on or near high voltage lines. Either take steps to eliminate the risk or move the victim, whichever is safest. If the situation cannot be resolved, call 911 immediately.
Determine if the victim is conscious; finding a pulse can lose precious seconds, so it is best to call out, asking “Are you okay?” and repeating if necessary. Apply first aid if necessary. If there is no response, call 911 right away and start CPR by initiating Circulation, Airway and Breathing steps (C-A-Bs). If possible, enlist bystanders for help in calling 911 and start CPR as soon as possible.
Recommendation
Rescuers who are not trained in CPR should still administer chest compressions as it is very easy for them to be instructed by an emergency services operator over the phone. An ambulance should always be called as soon as possible if you find a patient in need of CPR. CPR should only be performed to buy the patient time before the emergency services arrive and qualified medical professionals are able to take over and accompany the patient to hospital.
The priority for a healthcare provider should always be to alert the emergency services as well as performing CPR, especially if the rescuer is attending the scene alone.
Basic Life Support - BLS Certification Class
 When to Activate Emergency Response System
Wherever possible, a call to the emergency services and CPR should begin at the same time. If there is anyone else in the vicinity, ask them to call the emergency responders and retrieve the nearest AED whilst you begin to perform CPR.
If you are on your own and there is nobody else nearby to ask for help, leave the patient if you have to in order to seek help, retrieve the AED and call the emergency services.
If there are lots of people around, do not be afraid to assert your authority and ask others to perform certain tasks. Strong leadership is often required in these situations.
CPR for 2 Rescuers
For patients without an advanced airway:
Adults and children over 12: 30 chest compressions should be performed and then two long breaths should be administered. Repeat this cycle.
Children and infants: 15 chest compressions should be performed and then two long breaths should be administered. Repeat this cycle.
For patients with an advanced airway:
Adults and children over 12, young children and infants: chest impressions should be continuously performed at a rate of between 100 and 120 compressions per minute. One breath should be performed once every six seconds.
When to Stop CPR
If the patient regains a pulse, if the area becomes unsafe, if cardiac arrest last longer than 30 minutes, if the rescuer(s) is too exhausted or ordered to stop. Or, if these complications arise:
- You are in danger
- A pulse is regained
- The patient’s heart has been stopped for more than half an hour
- You become exhausted and cannot continue
- The chest compressions rupture a lung, puncture the skin, cause significant fractures or severe bruising of the chest and ribs
Bloodborne Pathogens to be aware of:
You should be careful of Hepatitis B and C, HIV and tuberculosis as it is possible for all of these diseases to be passed on through an exchange of bodily fluids. If there is blood in the patient’s mouth and you perform a lifesaving breath, there is a chance that a bloodborne disease they are carrying could be passed on to you. You should be aware of this at all times and you do not have to perform a breath if you do not feel safe and comfortable doing so.
Basic Life Support - BLS Certification Class
Adult CPR (Adults & Adolescents)
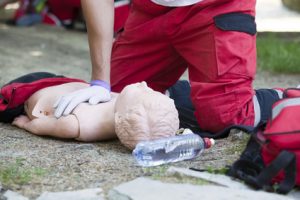
Step 1 – Safety
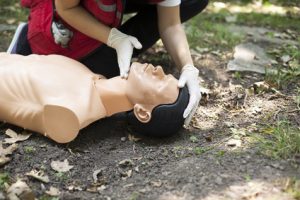 Check the environment to make sure that you are not putting yourself in danger by helping the patient. If it is safe to approach, check to see if the patient is responsive.
Step 2: Pulse Check
Place two fingers on the side of the patient’s neck, up against the windpipe. Press firmly for between five and 10 seconds to feel for a pulse. You can also try placing two fingers between the two wrist bones to find a pulse.
C is for Circulation (Compressions)
Adult and Adolescent Compressions
Circulation
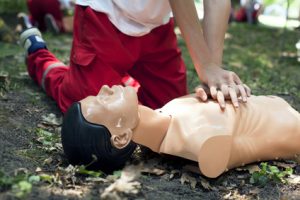 When the heart stops beating, blood stops flowing around the body. Chest compressions work to artificially stimulate the heart, helping it to pump blood around the body.
The patient should be laying flat on a solid surface usually the floor. The rescuer should place one hand on top of the other, and place the base of the palm toward the base of the patient’s sternum. The rescuer should then lock their elbows and position themselves above directly over the patient. They should then use their own body weight to compress the chest of the patient in a rhythmic fashion. The chest should compress at least a minimum of two inches, and the healthcare provider performing the compressions should ensure that they remove their full body weight in between each compression in order to let the heart refill with blood.
For an idea of rhythm, try matching the beats of the song “Staying Alive” in your head. Try to be consistent in the timing and rhythm of the compressions, and do not stop for more than 10 seconds if at all possible.
Chest Compression Fraction
Chest compression fraction is calculated as the percentage of the time spent performing CPR during a cardiac arrest. Interruptions, whether intended or not, should be kept to a minimum so that the chest compression fraction (ie the time spent attempting to resuscitate the patient) does not fall below 60%.
A is for Airway
Clearing the Airway
Make sure that the patient is lying on their back on a firm surface eg. the floor. Kneel down beside them at the height of their shoulders. Tilt the head back slightly by placing your palm on their forehead and lift the chin upwards with the other hand. Place your ear close to their mouth to listen for breathing and watch the chest for any movement. If you cannot hear, feel or see their breathing, mouth-to-mouth is required.
Jaw-Thrust Maneuver:
To perform a jaw-thrust, kneel behind the patient’s head. Place your elbows on the floor either side of the patients head. Put one hand on either side of the patient’s lower jaw. Squeeze your forearms to keep the patient’s head stable in place. Place your index fingers along the jawline and use the thumbs to roll back the lower lip. If there are still no signs of life, start to perform mouth-to-mouth.
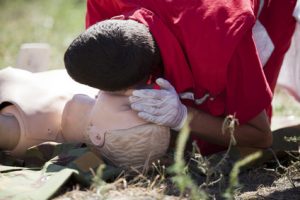
B is for Breathing
Rescue breaths, or mouth-to-mouth, are used to artificially introduce oxygen into the patient’s bloodstream when they have stopped breathing. This ensures that oxygen can be delivered to the brain and other vital organs to lower the risk of brain damage if the patient is successfully resuscitated.
Pinch the patient’s nose to form a tight seal. Place your lips over the whole of the patient’s mouth, so that your lips are sealed against theirs. Breathe deeply into their mouth, until you see their chest start to rise. If you cannot see the chest rise, the mouth-to-mouth is not being performed correctly and you may need to try again. Once you see the chest rise, perform another rescue breath before continuing with compressions.
Compressions should be continued at a rate of 120 per minute. If there are two of you, one breath should be given every 6 seconds. If you are on your own, aim to give two rescue breaths for every 30 chest compressions.
Rescuers should always avoid:
- Compressions at a rate slower than 100 per minute or faster than 120 per minute
- Compressions which are less than two inches deep or more than two and a half inches deep
- Leaning on the patient’s chest in between compressions
- Interrupting compressions for more than 10 seconds
- Administering more than two rescue breaths for every 30 compressions
CPR on obese patients
Yes, perform Chest Compressions
CPR on pregnant patients
Yes, perform Chest Compressions and a modification if the pregnant woman’s fundus height (baby-bump) is at or above the level of the umbilicus. If the woman’s fundus height is at or above the umbilicus, then High-quality CPR with manual left uterine displacement will be beneficial for relieving aortocaval compression during, the chest compression task. To perform manual left uterine displacement: push the uterus to the patient’s left side with 1 hand while still providing CPR.
Oxygenation and airway management should be prioritized during resuscitation from cardiac arrest in pregnancy because pregnant patients are more prone to hypoxia.
Fetal monitoring should not be undertaken during cardiac arrest in pregnancy because of potential interference with maternal resuscitation.
Opioid poisoning CPR for healthcare providers
1. Suspected opioid poisoning
- Check for responsiveness
- Shout for nearby help
- Activate the emergency response system
- Get naloxone and an AED if available
2. Is the person breathing normally?
If yes, prevent deterioration:
- Tap and shout
- Open the airway and reposition
- Consider naloxone
- Transport to the hospital
Continue assessing responsiveness and breathing.
If no, does the patient have a pulse? Assess for 10 seconds.
If yes, support ventilation:
- Open the airway and reposition
- Provide rescue breathing or bad-mask device
- Give naxolone
If no, start CPR:
- Use an AED
- Consider naloxone
- Use high-quality CPR
Child CPR (Age 1 Year to Puberty)
For the purposes of CPR, a child is classed as anyone between the age of one and puberty.
If you witnessed the collapse of the child taking place, you may follow the same steps as you would with an adult or an adolescent patient. Check the airway, pulse and look for signs of breathing.
If you did not witness the collapse of the child, but instead have found them in a collapsed condition, start with two minutes of CPR after checking for vital signs. After two minutes, if you are on your own, then leave the patient to retrieve an AED and to make an emergency call. Then return to the patient ASAP and continue with CPR until the response team arrives. If you are with someone else, these steps can happen simultaneously.
Step 1 – Safety
First check that you are in no danger by approaching the victim to help.
Step 2 – Vital Signs
In the same way that you would for an adult, lay your ear against the child’s mouth to listen and feel for any signs of breathing. Watch for signs that the chest is moving and check the neck and wrist for a pulse.
C is for Circulation (Compressions)
Performing chest compressions on a child
Chest compressions on a child serve the same purpose as they do for adult patients. The idea is to keep the blood pumping throughout the body in order to allow oxygen to continue to reach the brain and other vital organs. It is up to you to decide whether to use one hand or two in the case of a child. Small children may only require one hand, but for older children you may still need to use two hands.
Place your one or two hands on the base of the sternum. Remember to lock your elbows and use your body weight to compress the chest, taking care not to lean on the patient’s chest in between compressions so that the heart may refill with blood. Do not interrupt the compression for more than 10 seconds at a time.
You should maintain an even and fast rhythm. Try working in time to the beat of ‘staying alive’ in your head. If you are on your own, you should perform 30 compressions followed by two rescue breaths and repeat this cycle until the emergency team arrive. If there are two of you or more, the rescue breaths can be given over the top of the compressions with two breaths being given every 15 compressions.
Ensure that the child is lying on a flat surface with enough space for you to kneel beside them. It may be easiest to place them on the floor if they are not there already.
A is for Airway
 Kneel beside the child at their shoulder level. Follow the same steps to check the airway as you would with an adult patient. Support the head and tilt the chin upwards while you listen and feel for breathing. Look down the length of the child towards their toes to watch for the chest moving. You only need to check the breathing for up to 10 seconds before moving on to provide help.
B is for Breathing
If there are no signs of life from the child, you should move onto giving mouth-to-mouth (also known as rescue breaths). Follow the same steps as you would for an adult patient, but remember that children’s lungs have a smaller capacity than adults, so you will not need to breathe quite as hard or as long.
Squeeze the nose tightly shut to form an airtight seal. Place your lips over the child’s lips and breathe deeply into their mouth. If the chest doesn’t rise, check the airway again and repeat. Once you see the chest rise with the rescue breaths, continue the chest compressions cycle of 30 compressions to two rescue breaths.
Compressions should be continued at a rate of 120 per minute. If there are two of you, one breath should be given every six seconds. If you are on your own, aim to give two rescue breaths for every 30 chest compressions.
Rescuers should always avoid:
- Compressions at a rate slower than 100 per minute or faster than 120 per minute
- Compressions which are less than two inches deep or which compress more than half of the depth of the chest
- Leaning on the patient’s chest in between compressions
- Interrupting compressions for more than 10 seconds
- Administering more than two rescue breaths for every 30 compressions
Infant CPR (Age Less than 1 Year, Excluding Newborns)
For the purposes of CPR, an infant is classed as a child under the age of one, but CPR is not recommended for newborns.
If you did not witness the collapse of the infant, but instead have found them in a collapsed condition, start with two minutes of CPR after checking for vital signs. After two minutes, if you are on your own, then leave the patient to retrieve an AED and to make an emergency call. Then return to the infant ASAP and continue with CPR until the response team arrives. If you are with someone else, these steps can happen simultaneously.
Step 1 – Safety
First check that you would not be putting yourself in danger by approaching the victim to help.
Step 2 – Vital Signs
In the same way that you would for a child, lay your ear against the infant’s mouth to listen and feel for any signs of breathing. Watch for signs that the chest is moving. Instead of looking for a pulse in the wrist and/or neck, place your second and third fingers against the inside of the upper arm, halfway between the armpit and the elbow. This is a better place to check for a pulse on an infant.
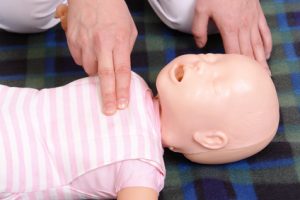
C is for Circulation (Compressions)
Compressions on an infant
Ensure that the infant is resting on a solid, flat surface. It may be easier to have them on a table or a raised flat surface rather than on the ground as you would with a child or an adult patient.
Do not use your whole hand when performing CPR on an infant patient. Find the center of their chest, slightly below the nipples. Place your index and third fingers together in the center of the chest. Perform the compressions using these two fingers. The chest should compress by about one-third of its depth.
You should maintain an even and fast rhythm. Try working in time to the beat of ‘staying alive’ in your head. If you are on your own, you should perform 30 compressions followed by two rescue breaths and repeat this cycle until the emergency team arrive. If there are two of you or more, the rescue breaths can be given over the top of the compressions with two breaths being given every 15 compressions.
A is for Airway
Ensure that the infant is lying on a firm, solid surface. Kneel close to the infant’s shoulder, or stand beside them leaning over their head. Place one hand on the top of the head and use the fingers on the other hand to gently raise the chin. Place your ear next to their mouth to listen for any sounds of breathing. You may be able to feel breath instead, or see the chest rising and falling in time with the breathing. If you do not see, hear or feel any signs of breathing for 10 seconds, CPR should commence.
B is for Breathing
Performing mouth-to-mouth on an infant.
Breathing into the mouth of an infant is different to performing rescue breaths on an adult or child. To administer a rescue breath to an infant, place your mouth over their mouth and nose, forming a tight seal against their skin with your lips. You do not need to breathe as deeply as you would for an adult or an older child. Only breathe in for one second, and watch to see the chest inflate as you do so. If the chest does not rise fully, there may be something blocking the airway. Check by looking into the infant’s mouth for any foreign bodies which may be causing an issue.
Once the rescue breaths have been performed, continue with the chest compressions.
Compressions should be continued at a rate of 120 per minute. If there are two of you, one breath should be given every six seconds. If you are on your own, aim to give two rescue breaths for every 30 chest compressions.
Rescuers should always avoid:
- Compressions at a rate slower than 100 per minute or faster than 120 per minute
- Compressions which are less than one inch deep or more than one and a half inches deep
- Leaning on the patient’s chest in between compressions
- Interrupting compressions for more than 10 seconds
- Administering more than two rescue breaths for every 15 compressions
Basic Life Support - BLS Certification Class
Fibrillation
 Ventricular Tachycardia
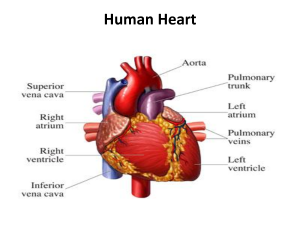
This condition occurs when the patient has a rapid heartbeat, beginning in the base of the heart in the ventricles. These are the main chambers in the heart which fill with blood and pump to deliver blood around the body. If the heart continues to beat too fast, complications can arise and damage can be done to the body’s vital systems.
Ventricular Fibrillation
This condition occurs when the muscles in the heart begin to quiver instead of contracting. It is a serious condition which requires immediate medical attention. If the patient does not receive treatment the blood can cease to circulate around the body causing vital organs to shut down. After just 4 minutes, serious and irreversible brain damage can be caused and after eight minutes, the patient is likely to die.
Automated External Defibrillator (AED)
When should an AED be used?
CPR is a vital action which as the power to make the difference between life and death. However, advancements in medical technology are also able to help patients in cardiac arrest. AEDs can be used to bring the patient’s heartbeat back into a natural rhythm. The emergency services should always be called before you use an AED as they are able to talk you through the necessary steps.
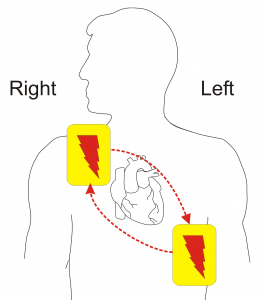
How to use an AED
 The first step is to witch the AED on. You will usually find an on button somewhere obvious, but occasionally there is a lever which needs to be pulled to activate the machine. All of the clothing should be removed from the patient’s upper half so that the skin is accessible. The pads of the AED should be attached to the bare skin on the patient’s chest. There will usually be a diagram in with the AED to show the location of where these pads need to be positioned. The left pad should be attached underneath the left armpit and the right pad should be placed underneath the collarbone on the right-hand side of the chest. The pads should be placed at least an inch away from devices which have been implanted into the patient.
Connect the wires carefully and make sure that everyone is standing back from the patient and avoiding any contact at all whilst the AED performs its analysis. If the analysis does not start when you connect the wires, click the analyze button to kickstart the process. When the machine instructs you to shock the patient, click the shock button whilst making sure to avoid all contact with the patient.
For Infants
AEDs are programmed to read the vital signs of each individual patient. It will, therefore, be able to determine the right shock to administer to a small infant. In the case of young babies, it is sometimes necessary to place one of the patches on the baby’s front and one on their back. If the pads are less than an inch apart when both are placed on the front, move one over to the back of the infant.
Special circumstances for resuscitation
Drowning
If a patient is unconscious following a near drowning, their wet clothing should be removed immediately and replaced with warm, dry garments or blankets. Rescue breaths should be given as soon as possible and a cycle of CPR should be given.
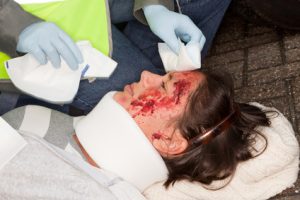
Trauma
Check for external and internal injuries such as damage to the head, neck, spinal column and any internal bleeding. The airway should also be checked carefully using the jaw thrust maneuver to ensure that no foreign bodies or dislodged teeth are stuck.Whilst performing CPR following trauma, rescuers should do their best to avoid exacerbating any injuries, but this should not come in the way of compressions or rescue breaths.
Electrocution
Make sure that you check the surrounding area for your own safety before you touch the patient or begin to perform any medical procedures. The patient may be unconscious as a result of an electric shock. If this is the case, and the electrical current is still live, there is a possibility that the shock could be administered to the rescue to if contact is made with the patient’s body. Always double check that there are no live wires or fuse boxes in contact with the body before touching them. Once you have checked the area and made sure it is safe, you can begin CPR.
Basic Life Support - BLS Certification Class
 Understanding First Aid Procedures
In emergencies rescuers need to act quickly and effectively because in many situations getting proper first aid means the difference between life and death for the patient. Knowing how to perform first aid correctly could easily mean that rescuers can end up saving someone’s life or minimizing catastrophic injuries, making a difference in the recovery from trauma and the future life of the victim.
There are many types of injuries that require first aid, and they range from non-serious (such as nosebleeds) to moderately severe (such as cuts and scrapes), to life-threatening (such as burns and loss of blood) or other injuries and conditions resulting from the injury.
Proper first aid begins with proper training in the correct application the techniques and being prepared with an adequate supply of first aid supplies. First aid supplies should be present in all locations where people have activities or interact socially, or the workplace, schools, institutions, and in automobiles.
An adequate first aid kit should contain the following items to properly prepare for most types of emergencies victims may find themselves in.
Items You’ll Need in a Medical Kit
- Regular size gauze pads (with a minimum size of 4 inches x 4 inches)
- Two to four extra-large sized gauze pads (with a minimum size of 8 inches x 10 inches)
- A large box of adhesive bandages (band-aids) in all different sizes from small to large
- One to two packages of gauze roller bandages that measures a minimum of 2 inches wide
- Two to four triangular bandages
- Wound cleaning agent such as hydrogen peroxide solution moist towelettes
- A small pair of sharp safety scissors
- A minimum of one warm cotton blanket
- A pair of tweezers
- One to two rolls of medical adhesive tape
- One to two pair of latex gloves
- Resuscitation equipment such as pocket mask, stoma, airway, or resuscitation bag
- Two to four elastic wraps
- One to two splints
- Written directions for getting emergency assistance
It is imperative for rescuers to be fully prepared and to have an emergency response plan in place and to quickly activate it to reach EMS personnel through the Emergency Medical Services (EMS) system. One more step that should be in place is having a plan in place to be able to quickly reach the Poison Control Center (1-800-222-1222).
The chances for the survival of a victim/patient increases dramatically the faster that emergency assistance can be reached and provided. If rescuer(s) are in danger, secure the area or move the patient to a safe area as soon as possible, if possible, and activate EMS without any unnecessary delays.
Basic Life Support - BLS Certification Class
Open Chest Wounds
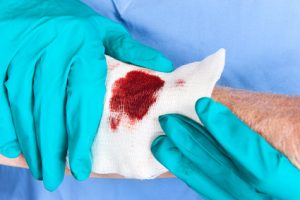
Open chest wounds may remain open while being treated with first aid. You may apply direct pressure to the wound to stop bleeding. Dressing the wound with a wrap or sterile pads may be required, and you may do so as needed. Keep in mind that dressings may become occlusive if they are left to saturate with blood, so all dressings must be attended to and extreme care must be taken so they are not left to accumulate too much blood. Change dressings frequently and modify the procedure as required by necessity.
It is very important to avoid dressing open chest wounds if it can be avoided, however, as the danger of a life-threatening condition known as tension pneumothorax may develop inadvertently. Other risks when treating an open chest wound are not as great as the potential of this grave condition, so if it is at all possible do not use dressings.
Dressing Open Chest Wounds: when you find it is unavoidable and an open chest wound must receive dressing, first activate the Emergency Medical Services (EMS) or call a 911 center immediately. Evaluate patient to determine if there is more than one open wound in the chest area, and if so, how many open chest wounds will require dressing.
The dressing should only be applied in the event of rapid blood loss. Remove the patient’s clothing, with the exception of any stuck clothing. Cut, size, and shape the dressing while making certain dressing is larger in dimension than the wound itself. Never at any time attempt to remove objects from the wound area, leave this for emergency personnel.
Punctured Wounds
This type of wound can be extremely severe, and if infected they pose a serious risk to health. If there is excessive bleeding from the wound, activate Emergency Medical Services (EMS) or contact a 911 center immediately. Evaluate the patient and if at any point in time the patient becomes unconscious or unresponsive or a pulse cannot be detected, begin CPR immediately and contact emergency personnel as previously instructed.
Treatment:
- Stop bleeding coming from the wound
- Call a 911 center immediately
- Staying away from the wound itself, clean the wound with soap and water thoroughly
- Apply an ointment to the wound such as Neosporin
- Administer a pain relief agent such as Advil, Aspirin, or Acetaminophen
- Wrap the wound again to prevent any infection from occurring
- If injury condition worsens seeks medical help at nearest hospital immediately
- Make sure the patient gets a Tetanus or Tetanus booster shot
Amputations
When treating amputations take the following steps:
Treatment:
- Practice universal precautions at all times
- Call a 911 center immediately
- If the patient is not breathing, administer CPR until emergency assistance arrives
- Apply direct pressure to the affected area
- Raise the injured area above the heart 12 inches
- If needed use a tight bandage or apply a tourniquet
- If it is possible, clean the amputated body part and keep it with the patient
- Wrap the body part in cloth and place inside plastic sealed bag in ice water
- Watch for signs of shock and treat if necessary
Cuts and Scrapes
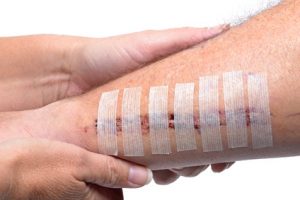
Follow the following steps when treating cuts and scrapes.
Treatment:
- Stop the bleeding from the affected area
- Apply thorough direct pressure to cut or scrape
- If wound is deeper than ¼ inch or bleeding is excessive, activate and contact Emergency Medical Services (EMS) or a 911 center.
- While staying away from wound itself, clean wound with soap and water thoroughly
- Apply an ointment such as Neosporin to affected area
- Administer a pain relief agent such as Advil, Aspirin, or Acetaminophen
- Wrap the wound again to prevent any infection from occurring
- If injury worsens seek medical attention at nearby hospital immediately
- Make sure the patient gets a Tetanus or Tetanus Booster shot
Basic Life Support - BLS Certification Class
Cardiopulmonary Arrest
Cardiopulmonary arrest, otherwise known as cardiac arrest or a heart attack, occurs when the heart stops beating and the flow of oxygenated blood ceases in the body of the affected patient. In many cases, the lack of the flow of oxygenated body throughout the body will result in the victim becoming unconscious or unresponsive. If left untreated, the most likely result will be death or probable brain damage in most cases. Victims should always receive treatment as soon as possible and never left untreated.
Heart Attack
A Heart attack is when the patient’s heart has stopped beating, the heart no longer receives oxygenated blood and begins the process of death. Symptoms of a heart attack include: sharp pain in the center of the chest area accompanied by profuse sweating, nausea or vomiting, and fainting or dizziness or lightheadedness.
Other pain throughout the body is also known to occur such as pain in the jaws, teeth or arms, neck, and shoulder areas.
Treatment: If a patient shows the symptoms of a heart attack and they are lifeless or not responding, begin the C, A, B techniques immediately, administer aspirin (check patient for allergies to aspirin if information is available) and quickly rush the patient to the nearest available hospital or activate EMS or call 911 for emergency assistance immediately. Do not wait for symptoms to “go away” and do not leave patient untreated. Begin CPR as soon as possible when discovering the patient condition or emergency situation.
Chest Pain
If a patient is experiencing the symptoms of a heart attack, then additional steps may be taken to ensure the well-being of the patient. If the signs of myocardial infarction are present in a patient, chewing an aspirin or two low dose aspirins may be recommended if the patient reports they have no existing allergies to aspirin. If a provider is unsure of whether aspirin allergies exist, the patient can be referred to Emergency Medical Services (EMS) personnel for additional emergency treatment.
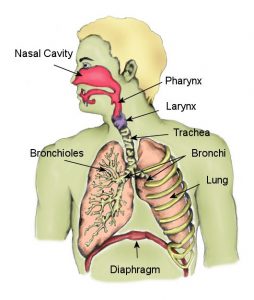 Respiratory Arrest
Respiratory arrest is when the lungs fail to function, the flow of oxygenated blood through the body will result. This condition must be treated immediately, otherwise, the most likely result for the patient will be death.
Loss of oxygen to the brain will cause unconsciousness, and in many cases, brain damage will also occur if left untreated. Measures can be taken to administer artificial ventilation, which is critical to saving the life of a patient who is experiencing respiratory arrest.
If a patient experiences respiratory arrest, they should be treated with CPR immediately, or as soon as possible. Emergency Medical Services (EMS) should be activated or emergency services requested by calling 911 and the patient should be rushed to and treated at a hospital.
Basic Life Support - BLS Certification Class
 Fractures
Fractures are very serious and can cause death or paralysis or deformity of limbs if not treated properly. It’s critical to understand what fractures are and how to evaluate their severity and know when it is appropriate to administer CPR techniques as a measure to treat those with injuries that include fractures.
Treatment: If the fractured area is bleeding, apply pressure to the area to stop the bleeding and wrap fracture if it becomes necessary to do so. If possible, apply a cold pack or ice pack to the affected fracture area to reduce swelling. If the patient is seriously injured and cannot move by themselves, do not attempt to move the patient. Contact Emergency Medical Services (EMS) or contact a 911 center as soon as possible.
Remember: In the event that a patient is feeling dizzy or lightheaded or has fainted or lost consciousness, take steps to elevate patient by placing legs at a slightly higher level than their heart in order to raise their blood pressure.
Dental Avulsion
In the event a tooth or teeth have been removed from a patient through injury, these teeth may be able to be implanted again successfully in the patient. In order for teeth to be implanted again, they must have viable dental cells for this procedure to be successful. To keep a tooth or teeth viable for re-implanting, the tooth or teeth must be stored in an appropriate solution until they can be rushed to a hospital to attempt re-implanting of the tooth or teeth.
A solution that is shown to have a high efficacy for this need is Hank’s Balanced Salt Solution. This solution will provide cell viability for 30-120 minutes. If a tooth or teeth have suffered avulsion, it is critical that if they are to be saved, the patient must seek medical help immediately to prevent the suffering of tooth loss.
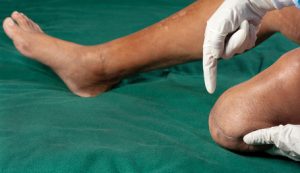
Bruises
Bruises are marked by the appearance of dark spots under the skin caused by broken blood vessels that have leaked and collected in patches, caused by falling, being struck, etc.
Treatment: Bruises will heal over sufficient time and are usually not serious. Pain can be somewhat alleviated in the patient by elevation of the affected area. The application of cold or ice packs or cold cloths will also reduce discomfort and decrease swelling. If necessary, the patient can also reduce pain and discomfort by taking Acetaminophen or Aspirin. If the bruise is located on the head or face area or lasts for a time longer than 14 days, a visit to a hospital may be advised.
Sprains and Strains
The main difference in sprains and strains are where they occur in the body, although they are quite similar. Sprains are injuries located in parts of the body with ligaments, such as wrists or ankles. The locations of strains may in the leg, such as a hamstring or thigh.
Treatment: In the event of a sprain or strain, elevate the affected area 12 inches above the heart. Apply a brace if possible or apply a bandage to the affected limb or joint to support the body. If using a cold pack, ice pack/compress or cold cloth only apply to the affected area for 20-minute time intervals. In the event that a patient becomes irritated, shorten the length of time that cold is applied to 10 minutes at a time.
Basic Life Support - BLS Certification Class
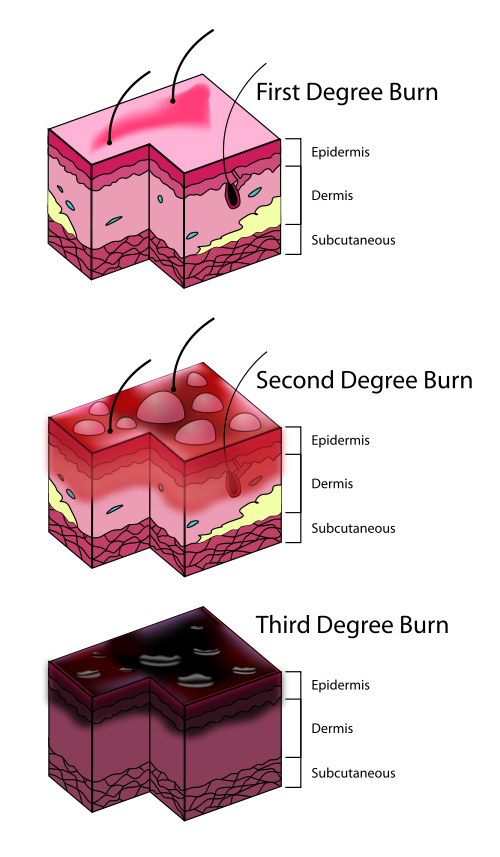 Burns are very serious, painful and can be life-threatening. There are three standard categories of burns; 1st degree burns, 2cnd degree burns, and 3rd-degree burns. There are specific procedures for treating the different burn degree types. Each degree of burn is based on layers of skin that have been breached by the burn.
1st Degree Burns
Symptoms of a 1st-degree burn includes acute redness, swelling of the burn area, and persistent pain uncomfortable enough to cause significant distress. Only the first layer of skin is affected by this type of burn.
Treatment
- Use cold packs, cold cloth, ice or bathe burn area to keep cool and moist
- Apply a burn crème or burn relieving ointment such as Aloe Vera
- Keep burn wrapped in gauze and replace several times a day until burn completely heals
- Administer pain relievers such as Advil or Aspirin or Acetaminophen
2nd Degree Burns
Symptoms of a 2cnd degree burn include severe pain, swelling in the affected area usually accompanied with blistering. The term second-degree burn refers to the burn itself breaching the second layer of skin.
Treatment: Burns can be very serious if not treated properly. If a burn is large and spans an area larger than 3 inches in diameter, then it is serious enough to require immediate treatment by medical personnel and a visit to a nearby hospital is advised. If the burn is smaller and spans an area smaller than 3 inches in diameter, then treat the burn much the same way you would treat a 1st-degree burn.
3rd Degree Burns

This is the most serious type of burn and can be life-threatening in some cases if left untreated or treated improperly. This type of burn breaches the 3rd layer of skin but in some cases, it may go deeper and include charring of the flesh. Immediate medical assistance is required and rescuers should activate Emergency Medical Services (EMS) and contact their 911 center without delay and rush the patient to a nearby hospital for medical treatment. In some cases, the charring of the flesh will deaden the nerve endings of the patient and they will not feel a high amount of pain.
Treatment
- Immediately call 911 and/or rush patient to the nearest hospital for help, do not ignore
- Initiate CPR if needed and administer CPR until EMS or emergency help arrives
- Do not remove the clothing of the patient, leave clothing on until they get to hospital
- Raise the area of the burn injury above the heart of the patient to raise blood pressure
- Cover the burn area with moist cold cloth until emergency help is provided
Upon evaluation by the provider: If evaluation by a provider determines the necessity for emergency assistance, activate EMS immediately under the following conditions:
- Broken skin or the appearance of blisters
- Breathing becomes labored or difficult
- Burn is located on face, neck, hands, or genital areas
- Burn is located on larger surface areas, i.e. the trunk of the body or the extremities
- Any other causes of concern
Electroshocks
Electroshocks are not known to cause any harm, mild or severe.
Treatment
- In the event of serious additional injuries, contact 911 center when appropriate
- If appropriate, begin CPR without delay
- Turn off the source of electrical power involved in shock
- Secure patient from all sources of electrical current and secure area from electricity
- Move the patient from the location of the power supply or source of shock
- If necessary, raise the legs of the patient above the heart of patient to raise blood pressure
Basic Life Support - BLS Certification Class
Bites & Stings
Most bites and stings commonly experienced are not extremely serious, however, there are some types that have serious, even life-threatening consequences if left untreated. The majority of stings do not result in fatalities, yet there are certain insects that are carriers of deadly diseases such as Lyme disease, the Zika virus, or the West Nile virus.
Severe reactions to stings include a condition known as anaphylaxis. Symptoms of this condition include abdominal pain, difficulty breathing, a lowering of blood pressure, redness, swelling, or vomiting and nausea.
Mild Reactions: Mild allergic reactions usually take the form of swelling of the area around sting, diarrhea, cramps, vomiting, and nausea. When treating mild reactions to a sting, treat with universal precautions, gently remove the stinger from the patient, and apply a cold pack or cold cloth to the area. Administer a pain reliever such as Advil, Aspirin, or Acetaminophen to the patient, as well as Benedryl or another form of antihistamine if necessary.
Severe Reactions: Symptoms of a severe, and the potentially dangerous reaction may include labored or difficulty breathing, swelling of the lips and throat, fainting or dizziness, hives, vomiting, and nausea.
Treatment: Administer an epinephrine auto-injection into the patient’s mid-outer thigh, not buttock, hands, feet, veins, or other body parts. If the reaction is severe, administer CPR immediately.
Drug Overdose
 Those who experience a drug overdose have ingested far above the prescribed or recommended amount of a drug and may suffer from a range of symptoms and if left untreated this may result in death. There are a wide number of potential reactions to a drug overdose, including unconsciousness or drowsiness, hallucinations, an excitement paired with a rapid heartbeat, and impaired decision-making skills or judgment.
Other symptoms of a drug overdose may include difficulty breathing, unconsciousness. Delusional behavior or aggressive violent behavior, convulsions, sweating, numbness, vomiting or nausea, abnormal pupil size or non-responsive pupils.
Treatment: Use all universal precautions and evaluate the patient. If the patient is unconscious, unresponsive, or has no pulse, begin CPR at once and activate Emergency Medical Services (EMS) and call a 911 center immediately. If possible reassure patient of their safety and try to keep them calm. Evaluate patient for symptoms of shock and treat accordingly while monitoring vital signs. Document any and all of the drugs taken both as overdose and otherwise and report to emergency personnel.
Poisoning
 Poisoning can be fatal in many cases and should be taken extremely seriously and not left untreated. If you suspect or know a patient has been poisoned, contact the National Capital Poison Center by phone at 1-800-222-1222.
Symptoms of poisoning include any of the following: difficulty breathing, vomiting or nausea, confusion, sleepiness or drowsiness, chemical odors exuding from the mouth area, burns (redness) around the mouth area, burns on skin or clothing. When treating the ingestions of poison, never administer anything by mouth unless specifically directed to do so by PCC or EMS personnel.
Treatment: If the patient is not breathing or is unconscious, administer CPR immediately and activate Emergency Medical Services (EMS) or contact a 911 center immediately. Wash and rinse out the patient’s mouth and take them outside into fresh air if possible. Read the labels of the chemicals that have been ingested and follow the directions on the label for accidental poisoning. Flush out the eye areas of the patient and wash and clean the skin of affected areas. Keep the chemical container or the label of the chemical ingested and give to EMS personnel when they arrive on the scene.
Alcohol Intoxication
Alcohol Intoxication is the rapid consumption of large amounts of alcohol in a short period. It’s also known as alcohol poisoning and can affect your gag reflex, body temperature, breathing, and heart rate. It can also occur when a child or adult intentionally or accidentally consumes household products that contain alcohol. Symptoms include vomiting, hypothermia (low body temperature), unconsciousness (passing out), seizures, and blue-tinged or pale skin.
Treatment: If you suspect alcohol intoxication, call 911 immediately. Then, move the person away from alcohol. If they’re conscious, encourage them to lie on their side as you await medical attention. If the person is unconscious, gently turn them to their side to prevent them from choking on their vomit.
Carbon Monoxide Poisoning
Carbon Monoxide Poisoning occurs when you breathe in carbon monoxide (CO) at excessive levels, causing it to build up in your bloodstream. CO is a gas produced by burning wood, propane, or gasoline, and it can easily accumulate at dangerous levels in enclosed spaces. Carbon Monoxide Poisoning often results in severe tissue damage and even death. Symptoms include weakness, confusion, dizziness, loss of consciousness, shortness of breath, dull headache, vomiting or nausea, and blurred vision.
Treatment: If you suspect Carbon Monoxide Poisoning, call 911 or your local emergency services immediately. As you await medical care, get fresh air by leaving the area with CO. If you can, it’s wise to turn off the CO source.
Perform CPR if the person loses consciousness or stops breathing.
Basic Life Support - BLS Certification Class
 Hemorrhages
A significant loss of blood in a patient’s body is known as a hemorrhage. Hemorrhages are classified into four different types, based on the amount of blood the patient has lost in one period of time.
Class 1
This class of hemorrhage includes up to 15 percent blood loss volume. Typically, there are no changes to the vital signs of the patient.
Class 2
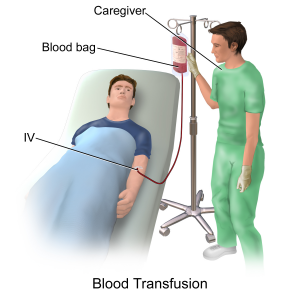
The second class of blood loss ranges from a loss of 15 percent to 30 percent of the patients total blood volume in one period of time. In these cases, blood transfusions are not typically necessary, however, the use of a saline (salt water) solution may be needed. The loss of this amount of blood is usually accompanied by a rapid heart-beat.
Class 3
 This class of hemorrhage is marked by a 30 percent to 40 percent loss of blood volume and is quite severe. Steps must be taken to treat the patient, as it will become necessary to perform blood transfusions to save the life of the patient. Symptoms displayed by the patient usually include a rapid heart-beat along with a sudden drop in blood pressure.
Class 4
When a patient has lost 40 percent or more of their total blood volume. Resuscitation must be performed in order to prevent death from occurring.
Treatment: Evaluate patient using all universal precautions. If necessary, initiate CPR and activate Emergency Medical Services (EMS) or call a 911 center immediately or bring the patient the nearest hospital as quickly as possible. If needed, wrap the hemorrhage to prevent further loss of blood.
Hypoglycemia
Hypoglycemia is a bodily syndrome that is caused by low blood sugar. For diabetics, hypoglycemia can be life-threatening if not treated. Never leave a patient who appears to be experiencing hypoglycemia untreated.
Symptoms: The symptoms of hypoglycemia range in severity. Varying from person to patient, at the onset of this syndrome a patient may experience shakiness, sweating, hunger, anxiety, fatigue, irritability, pale skin, heart palpitations, and a tingling sensation around the mouth areas.
This syndrome can increase in severity and symptoms may become much worse. Severe symptoms of hypoglycemia include a confused state of mind, seizures, abnormal behavior, blurry vision, inability to perform ordinary routine tasks and unconsciousness. This syndrome must not be left untreated.
Treatment: In most cases, the occurrence of symptomatic hypoglycemia can be treated with oral glucose tablets. If no oral glucose tablets are available, the substitution of liquids such as juice and foods containing sugars such as sucrose, fructose, oligonucleotides are acceptable and will effectively combat and reverse the effects of hypoglycemia. Oral glucose tablets and liquids or foods containing these sugars will rapidly absorb into the bloodstream and counteract hypoglycemia quickly.
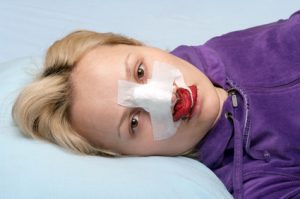
Nosebleeds
In many cases nosebleeds are a common occurrence and are not a serious medical issue requiring emergency services, CPR, or hospitalization. However, in some cases, they may be much more serious and require emergency resuscitation treatment.
Treatment: In the event a nosebleed is a result of a much more serious trauma to the body such as a head injury or broken nose, you will need to take steps to treat the patient. If a patient has a nosebleed from a serious injury and there is profuse bleeding, apply direct pressure to the area for at least 10 full minutes. During this time direct the patient to breathe through their mouth.
After the period of applying pressure is finished, take a moment to clear the nasal cavity of the patient. If the patient is suffering from congestion, wash the nasal cavity thoroughly and use a nasal decongestant after directing the patient to blow or clear their nose to assist in clearing the congestion. If the patient lapses into an unconscious or unresponsive state, begin CPR immediately and activate Emergency Medical Services (EMS) or call a 911 center immediately and secure emergency services for the patient.
If the patient – if the patient experiences repetitive nosebleeds, it may indicate that there is a much more serious medical condition present. In this case, contact a physician or hospital and have the patient evaluated and treated by medical personnel.
Basic Life Support - BLS Certification Class
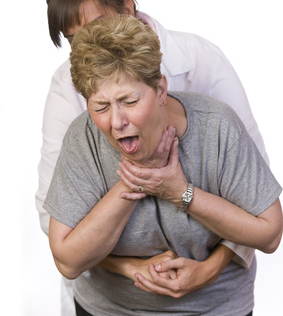
Choking
Choking occurs when food or other objects become lodged in the windpipe or throat of the patient. In children, many times choking occurs because of the swallowing of small toys or other small objects. Choking should be treated very seriously because it can lead to permanent organ damage or death if left unrecognized and untreated.
 If the patient has become unconscious or unresponsive, take emergency measures and contact a 911 center immediately for further treatment.
Infants 12 months or Younger
Position the patient face-down on the surface of the forearm, while resting the forearm on the thigh for support. Perform a thumping action 5 times on the back of the infant, using the heel of the hand.
In the event choking continues, turn the infant over to a face-up position and prepare to administer chest compressions. Using two fingers placed upon the breastplate, perform 5 chest compressions. Keep repeating this process until object becomes dislodged and choking ceases.
Children and Adults
In choking patients, the universal emergency treatment is what is known as the Heimlich maneuver. First quickly evaluate the patient and determine if they are indeed choking. Then act quickly to perform the Heimlich maneuver on the patient.
The Heimlich maneuver consists of several steps. The first step is to stand directly behind the patient. Position the patient so they are leaning slightly over, then wrap hands and arms around the waist of the patient.
Take fist and close it tightly, and then grab fist with another hand. Press the interlocked fists, performing 5 sharp, hard thrusts into the abdomen of the patient. Repeat this cycle until object becomes dislodged from the windpipe of the patient. This maneuver is highly effective and should be used immediately in choking cases.
Unconscious Person
If the patient is unconscious, you will need to take additional steps to perform the Heimlich maneuver effectively. The first step is to position patient so they are lying on their back, face-up, in an area free from obstructions. If necessary, use fingers to swipe the patient’s airway to clear it out before you begin performing the Heimlich maneuver. Perform Heimlich maneuver until object becomes dislodged from windpipe or throat.
If you are unable to clear the airway of the patient, or you can’t see or dislodge the object from the throat or windpipe, begin CPR and activate Emergency Medical Services (EMS) or call a 911 center immediately. If the patient is unconscious or is not showing signs of life, begin CPR immediately and get emergency assistance as previously instructed.
Dehydration
Exertional Dehydration
Dehydration occurs most often when the patient is performing strenuous exercise in humid, hot environmental conditions for extended periods of time. Dehydration is a result of the body losing more fluids than it consumes, and if lost fluids are not regularly replaced, the patient will experience dehydration eventually.
Treatment: In many cases ingestion of ordinary H2O is sufficient to restore the levels of bodily fluids in dehydration victims. Additionally, patients may rehydrate by using carbohydrate-electrolyte (CE) drinks with a solution of 5 percent to 8 percent, or by drinking coconut milk and water drinks. The use of these drinks will restore the electrolyte balance in the patient as well as provide enough H2O for the patient’s body to sufficiently recover from dehydration.
Severe Dehydration Treatment: In cases of severe dehydration, the condition of the patient may be life-threatening. Steps should be taken to rehydrate the patient and the rescuer should activate Emergency Medical Services (EMS) and call 911 immediately for emergency assistance.
Heat Stroke
Heatstroke is a form of heat injury caused by prolonged exposure to high temperatures or physical exertion. It usually occurs during summer. Symptoms include High body temperature – usually 104 F or higher, nausea and vomiting, headache, confusion, slurred speech, agitation, or irritability, rapid and shallow breathing, flushed skin, and racing heart rate.
Treatment: If you suspect heatstroke, first move the individual out of the heat and remove any heavy or excess clothing. Second, cool them by spraying cold water, placing them in a cool tub of water, or fanning.
Then, give the person a cool drink to rehydrate. Ensure it’s not alcoholic or caffeinated and avoid cold drinks to prevent stomach cramps. Lastly, perform CPR if they show no signs of breathing.
Heat Exhaustion
Heat Exhaustion is a heat-related illness that can occur through exposure to high temperatures, especially when combined with strenuous physical activity and high humidity. However, it’s not as severe as a heatstroke or heat cramp. Symptoms include heavy sweating, faintness, muscle cramps, dizziness, nausea, headache, weakness, and rapid pulse.
Treatment: First, move the person out of the heat and into an air-conditioned or shady area, then lay them down. Ensure their legs and feet are elevated slightly. Second, remove any heavy or tight clothing and give the person cool water or any nonalcoholic drink.
Lastly, cool them by fanning or spraying cool water.
Hypothermia
The state of hypothermia exists when the patient’s body temperature falls below 95 degrees F. Hypothermia is caused by the body losing heat at a rate more rapid than it can produce energy to form body heat.
The most common form of hypothermia is caused by the immersion of the patient’s body in cold, freezing water for extended periods of time. If hypothermia is left untreated, the nervous system will break down, leading to potential organ damage and possibly death in some cases.
Treatment: Remove the hydrated, wet clothing of the patient and provide dry, warm clothing to replace it. Provide a dry, warm environment for the patient to recover their body heat. If available, provide the patient with a warm beverage to raise the body temperature. You may apply dry, warm compresses on the body of the patient, but do not apply direct heat to the skin of the patient.
If the patient has lost consciousness or has become unresponsive, apply rescue breaths, and if these are unavailable perform chest compressions. If the patient is not showing signs of life, administer CPR and activate Emergency Medical Services (EMS) and contact a 911 center immediately.
Frostbite
Frostbite is an injury that occurs when the skin is exposed to freezing temperatures, causing redness, numbness, and paleness. Symptoms include cold skin, white, red, or grayish-yellow skin, clumsiness as a result of muscle and joint stiffness, numbness, hard-looking skin, and blistering after rewarming, usually in severe cases.
Treatment: you can treat mild frostbite by following these steps:
- Get out of the cold
- Protect your skin from further damage – If the affected area has thawed, wrap it to prevent refreezing. However, if you suspect they may freeze again, avoid thawing.
- Gently rewarm the affected areas by soaking them in warm water (105-110 F) for about 20 minutes.
- Drink warm liquids such as coffee or tea.
Asthma
Asthma is a long-term disease of the lungs that causes your airways to narrow and swell, making breathing difficult and trigger coughing. Asthma also results in shortness of breath and wheezing (whistling sounds) when you breathe out. Symptoms include chest tightness and pain, trouble sleeping as a result of wheezing, coughing, or shortness of breath, wheezing when exhaling, and wheezing or coughing that gets worse during a respiratory virus such as the flu.
Treatment: First, help the person sit in a comfortable position and loosen any tight clothing. Then, help them take their asthma medication (inhaler). If they don’t have any medication, call 911 immediately.
Basic Life Support - BLS Certification Class
Types of Injuries
There are several main types of injuries, such as eye injuries, concussions, head injuries, and spinal injuries. These injuries range in severity and each of them requires different first aid and emergency steps to treat them.
Eye Injuries
The main types of common eye injuries include the Black Eye, a Chemical Splash in the eye area, and having a Foreign Object lodged in the eye area.
Black Eye
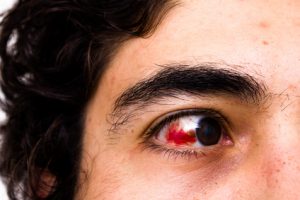
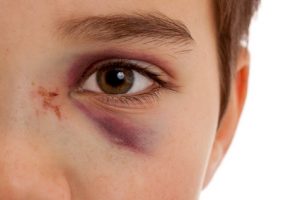 A black eye is a result of an injury to the eye area such as being struck that causes blood vessels to become broken under the skin, or bleeding under the skin, which makes the flesh around the eye bruise and becomes discolored (black). Bleeding within the eye itself is a condition known as Hyphema, where there is blood in the cornea area of the eye or within the front chamber.
Treatment: Most black eye conditions are not overly serious, but they require first aid treatment to minimize the damage the injury has caused. If possible, apply an ice pack or cold compress or cold, wet cloth to the eye area to reduce the swelling of the injury and facilitate the healing process. If the eye shows signs of internal bleeding or if there is blood leakage from the eye, seek emergency assistance from the nearest hospital immediately.
Foreign Objects
 Many times foreign objects can be quickly and easily removed from the eye area, but in some cases, this type of injury can be quite severe in nature. Do not leave untreated and be certain this type of injury is treated properly.
Treatment: Before treating, wash hands with soap and water thoroughly so they are completely clean. Pull down the lower lid of the eye, while directing the patient to look in an up and down motion. Wash out the eye area with H2O or a saline solution to dislodge the foreign object(s), and make sure the eye area is clean.
If there are any visible abnormalities or serious, persistent pain and rescuer is unable to remove or dislodge the foreign objects from the affected area or objects are embedded in the eye, seek help immediately by contacting a 911 center or rushing patient to the nearest local hospital for treatment.
Chemical Splash
Chemical splashes, depending on the chemical involved can be non-injurious to severe in nature, creating no pain, mild pain, or extreme pain in the victim.
Treatment: If necessary, remove any contact lenses from the patient before treatment. Position the patient’s head beneath running warm or lukewarm water and let the water run over patient’s eyes for a duration of at least 20 minutes. Continue for a longer duration if pain continues to persist. If there is persistent pain or damage is severe, call a 911 center or rush the patient to the nearest hospital for treatment. If possible, bring the chemical container or at least the label for the container with the patient to the hospital and deliver to emergency personnel for a medical determination.
Concussions
Concussions can be extremely severe injuries with dangerous consequences and emergency steps need to be taken immediately to treat a patient who has experienced a concussion. Never leave concussions untreated, no matter how severe.
Call 911 Immediately if:
- Inability to properly balance the body
- Pupils are dilating unequally
- The occurrence of a seizure(s)
- Vomiting more than one time
- Extreme drowsiness or unconsciousness
- Persistent spinal or neck pain
- Pronounced weakness on one side of the body
- A slurring of the speech
Examine the patient, evaluate the severity head injury and test for evidence of a concussion as soon as possible, especially if there is a loss of consciousness.
Treatment: Be certain that patient stops the activity they were involved in, such as sporting activities. Direct the patient to rest in a quiet area free from noise and activity, if possible. To reduce swelling and prevent the injury from becoming worse, use ice wrapped in a washcloth and apply gently to the injured area.
Administer a pain relief agent such as Advil or Motrin, Aspirin, or Acetaminophen and offer the patient a glass of cold water. If the injury is severe, activate Emergency Medical Services (EMS) and contact a 911 center immediately and rush the patient to the nearest hospital for emergency treatment.
Head Injuries
 Many times a head injury only amounts to bruises or bumps on the head, but in other cases, these injuries can be quite severe and require emergency treatment.
Call 911 Immediately if:
- There is a presence of a severe headache
- There is slurring of speech in the patient
- The patient has suffered a seizure or seizures
- Patient has difficulty maintaining balance in the body
- The pupils of the patients are unequal in size
- The face of the patient becomes discolored
- Patient appears disoriented or confused
- Motor skills are impaired or patient is unable to use certain body parts
- Patient is bleeding severely from the face, head, ears, or nose areas
Do not Attempt
Do not attempt to move the patient and refrain from removing clothing unless it is absolutely necessary. If blood loss is occurring, apply dressing to prevent further blood loss, but do not apply any pressure to any head wounds. If the patient is unconscious or unresponsive or there is no pulse that can be found, begin CPR and activate Emergency Medical Services (EMS) and contact a 911 center for emergency services as soon as possible.
Spinal Injuries
Injuries to the spine are extremely serious and dangerous, and great care needs to be taken to treat the patient. If there any kind of suspicion that a patient has suffered a spinal injury, do not move patient for any reason. Reasons to suspect there may be a spinal injury include: severe head injury, severe back pain, lack of bodily control of bowels, bladder, or limbs or numbness of the body.
Treatment: Activate Emergency Medical Services (EMS) and call a 911 center immediately. Do not attempt to take the patient to a hospital yourself, as precautions and special handling must be used to move a patient with a spinal injury. Make sure to prevent the patient from moving or being moved around or disturbed, be certain the patient lies as still as possible.
If the patient is unconscious or unresponsive or has no pulse, begin CPR and if the patient has no pulse, begin a minimum of chest compressions. Do not remove any items from the patient’s person. If the patient is experiencing bleeding from the nose or mouth or is vomiting and there are two responders, turn the patient on their side, taking care the patient’s body is following the synchronized movements of both responders.
Basic Life Support - BLS Certification Class
Shock
Shock can set in from a variety of causes. When a patient falls into shock, the body may stop the flow of oxygenated blood. Vital organs can be severely affected, and brain damage can result if oxygenated blood does not reach the brain. People can also die from shock or the problems associated with shock. People develop shock for a number of reasons including heat stroke, profuse blood loss, poisoning, severe burns, trauma to the body or extreme medical accidents.
Signs that a patient may be suffering from shock include: unconsciousness or poor responsiveness, cold and/or clammy skin, nausea or vomiting, and a dilation of the pupils.
Treatment: Evaluate the patient and begin CPR if deemed necessary. Contact Emergency Medical Services (EMS) and activate or call a 911 center immediately if the patient is unconscious or unresponsive. Be certain to elevate the body of the patient in a position with the feet 12 inches above the heart. It may be necessary to position patient on their side to prevent the danger of choking. Evaluate the patient for any additional injuries and report these to emergency personnel when they arrive at the scene.
Seizure
Symptoms found in patients who are experiencing seizures include unconsciousness or unresponsiveness, labored or difficulty breathing, uncontrolled bowel movements, the arching of the back, and clenching of the teeth or other objects. In the event of unconsciousness or unresponsiveness, contact Emergency Medical Services (EMS) or contact a 911 center immediately and begin administering CPR without delay, continuing until emergency assistance arrives.
Treatment: Check the patient utilizing universal precautions. Secure the patient, remove any potential life-threatening objects from immediate area and loosen the clothing of the patient. Never restrain the patient unless there is a danger to the patient or patient may hurt others. Contact the appropriate emergency personnel while administering CPR if deemed necessary.
Stroke
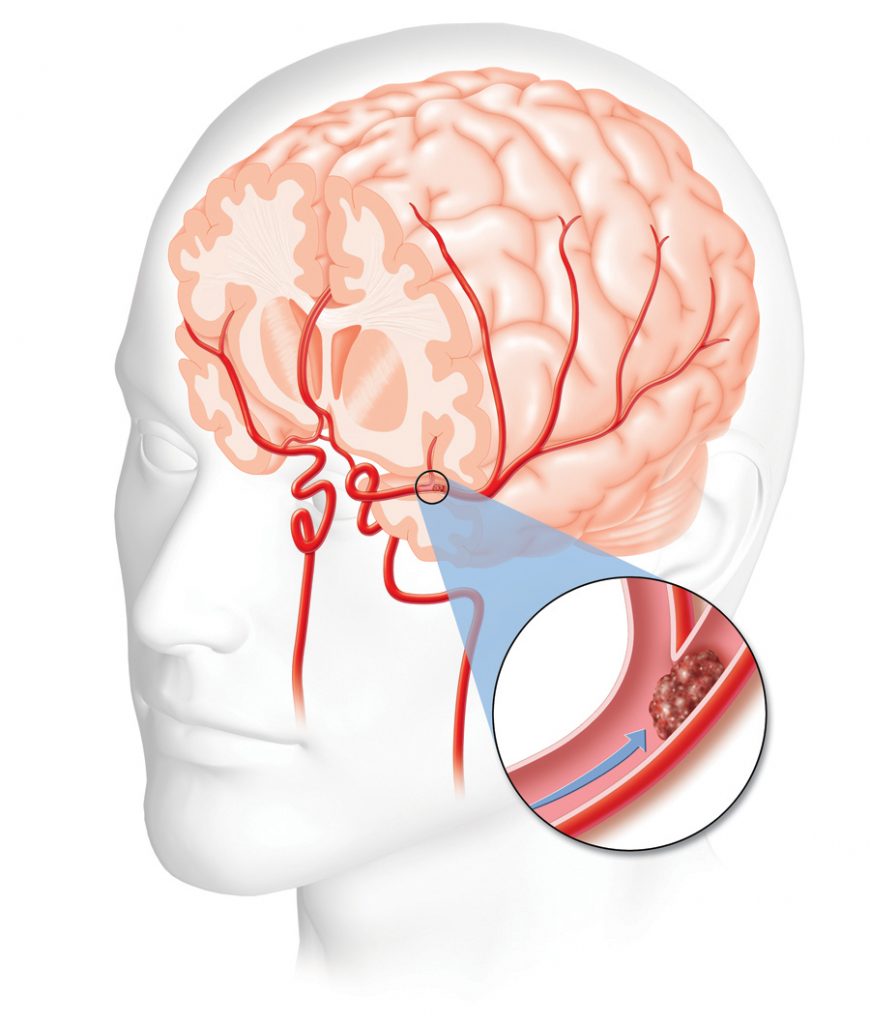 A stroke results from a blood vessel in the brain that has ruptured or been blocked. The human brain will suffer damage and deterioration when it stops receiving oxygenated blood. For rescuers or first providers, the severity of the stoke must be determined, therefore a stroke assessment system must be utilized.
The Cincinnati Pre-Hospital Stroke Scale (CPSS Stroke Scale) is a simple tool designed to accurately assess the condition of those suffering from a stroke. If a patient ever falls into an unconscious state or becomes unresponsive, begin to administer CPR immediately and contact Emergency Medical Services (EMS) or contact a 911 center immediately and follow their instructions.
Facial Droop
A patient may experience facial droop if they have suffered from a stroke. Check the following for severity and report to emergency personnel upon their arrival.
- To Check: ask the patient to smile the best they can for you
- Normal State: the cheeks of the patient move equally on both sides of the face
- Abnormal State: the cheeks of the patient do not move equally on both sides of the face
Arm Drift
The body may be limited in the movement because of stroke, check the arm drift of the patient and report to emergency personnel when they arrive.
- To Check: ask patient to raise their arms at the length of their shoulders for 10 seconds or longer
- Normal: both arms move equally together without variation
- Abnormal: movement of arms fails to be equal
Speech
The speech of those suffering from a stroke may be different than normal speech, evaluate by checking and report to emergency personnel when they arrive.
- To Check: Ask patient a simple question requiring a short answer
- Normal: Patient will not slur their words and will give an intelligible answer
- Abnormal: The patient will use abnormal words, slur their words, or remain mute and not answer
When the examination of the patient is complete, if there is the occurrence of one of these three potential factors returning an abnormal result, there is statistically the probability of a 72% chance of stroke.
Risk Factors
Basic Life Support - BLS Certification Class
 If you need further explanation or information regarding this course or you are interested in deeper learning on this subject, please contact OSHA, the health and safety department where you work, or any local infection control agency or health department.
Bloodborne Pathogens and Other Potentially Infectious Materials (OPIM)
The BBP portion of this BLS class comply with the definitions of bloodborne pathogens, best practices for handling them as well as OPIMs, limiting risk and exposure as well as treatment as issued by the Occupational Safety and Health Administration (OSHA). OSHA is the federal agency charged with regulating safety and preparedness in the workplace.
It is a legal requirement that any employee who handles blood, OPIMs and bodily fluids take a course in the safe handling of these materials. For many employees, some sort of certification or credentialing is also required.
Bloodborne Pathogens
- Hepatitis A virus
- Hepatitis B virus
- Hepatitis C virus
- Human Immunodeficiency virus (HIV)
- Acquired Immunodeficiency Syndrome (AIDS)
- Other disease pathogens
Transmission Routes
- Burns
- Puncture wounds
- Bites
- Cuts
- Rashes
- Mucosal membranes
- Abrasions
Fluids
- Pleural fluid
- Vaginal fluid
- Cerebrospinal fluid
- Semen
- Synovial fluid
- Blood
Fluids with No Risk for Transmission
- Tears
- Saliva
- Vomit
- Urine
- Nasal fluids
- Sweat
- Sputum
Risk Factors for Bloodborne Pathogens
- Hemodialysis patients
- Intravenous drug users
- Birth
- Sexual contact
- Direct contact with blood or other bodily fluids
Hepatitis
 Most hepatitis is caused by transmission of the virus through parenteral contact with infected blood or bodily fluids. Hepatitis disease attacks the liver, causing inflammation and reduced hepatic function.
Hepatitis A
This variant of the hepatitis virus is transmitted orally or through infected fecal matter (often as a result of inadequate hand washing), and is an RNA virus. It is considered a less dangerous form of the virus and is less likely to develop into chronic hepatitis or to cause the patient to have the more serious symptoms and side effects of other variants of the virus. It is a self-limiting virus and does not always remain persistently in the bloodstream.
Symptoms
- Loss of appetite
- Choluria
- Fever
- Muscle and joint pain
- Nausea and vomiting
- Persistent fatigue
- Abdominal or stomach pain
- Jaundice of the skin or eyes
Treatment: There is a vaccine available for Hepatitis A.
Hepatitis B
This strain of hepatitis is transmitted through contact with infected blood or other bodily fluids. Most commonly, transmission occurs through sexual contact, use of shared needles, accidental needle sticks with contaminated needles (particularly in health care workers or custodial staff), childbirth or blood transfusion. There are also known cases of transmission through shared razor blades or toothbrushes as well as body piercing and tattooing. Hepatitis B can become chronic and does remain in the bloodstream.
Symptoms
- Loss of appetite
- Choluria
- Fever
- Muscle and joint pain
- Nausea and vomiting
- Persistent fatigue
- Abdominal or stomach pain
- Jaundice of the skin or eyes
Treatment: There is a vaccine available for Hepatitis B. Patients with chronic Hepatitis B may require a liver transplant. These patients may also be treated with antiviral medications.
Hepatitis C
The variation of the virus known as Hepatitis C is one of the more dangerous forms of the virus, as it can develop into a chronic condition and cause serious, sometimes fatal, side effects and significantly impair the function of the liver. Patients who have contracted this virus may carry it for long periods of time without any manifestation of symptoms. This virus is transmitted through direct contact with infected blood or bodily fluids. Most commonly, Hepatitis C is contracted through sexual contact, shared needles, accidental needle sticks, particularly in healthcare workers and custodial staff, childbirth and blood transfusion. Transmission can also happen through hemodialysis and organ transplantation. There are also known cases of transmission through shared razor blades or toothbrushes as well as body piercing and tattooing. Hepatitis C can become chronic and does remain in the bloodstream.
Symptoms
- Loss of appetite
- Choluria
- Fever
- Muscle and joint pain
- Nausea and vomiting
- Persistent fatigue
- Abdominal or stomach pain
- Jaundice of the skin or eyes
- Unusual or excessive bruising and bleeding
- Edema in the lower extremities
- Confusion or disorientation
- Spider angiomas
Treatment: There is no vaccine available for the treatment of Hepatitis C. The standard treatment for this disease is the use of antiviral medications over a prescribed period of time to remove the virus from the bloodstream and cure the patient. In the event that liver damage is too great, the best treatment may be a liver transplant.
Difference between Acute and Chronic Hepatitis
Acute Hepatitis manifests in three stages. The initial stage may have no symptoms other than the patient exhibits fatigue or other non-specific symptoms. In the second phase, the patient may develop jaundice, liver and abdominal pain, and perhaps a worsening of general symptoms. The final stage is recovery. Acute hepatitis will resolve within six months. Acute Hepatitis is usually tied to Hepatitis A.
Chronic Hepatitis follows much the same pattern as Acute Hepatitis but is linked more closely to Hepatitis B and C. More importantly, the disease does not resolve within a six month period. The virus continues to persist in the blood. Patients may continue to experience symptoms and more importantly, the danger of significant damage to the liver is much greater. As many as 5% of all patients with Chronic Hepatitis will die as a result of complications from the condition.
Human Immunodeficiency Virus (HIV)
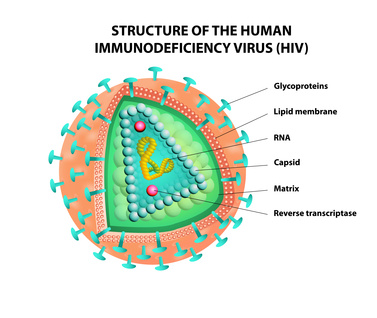 Human Immunodeficiency Virus, also known as HIV, is a virus that attacks the body’s immune system, reducing its ability to fight infection. Once this virus is introduced into the bloodstream, it remains and must be treated as a chronic condition.
This virus is transmitted through sexual contact, from mother to infant during childbirth, breastfeeding, shared needles, blood transfusion, organ transplant, or accidental needle stick. Infected blood must come into contact with mucosal membranes, wounds or damaged tissue or inserted into the bloodstream directly. The virus lives in semen, blood, breast milk, pre-ejaculate, and vaginal fluid.
Symptoms
- Sore throat
- Fever
- Rash
- Achy muscles and joints
- Severe headache
- Swollen lymph nodes and glands
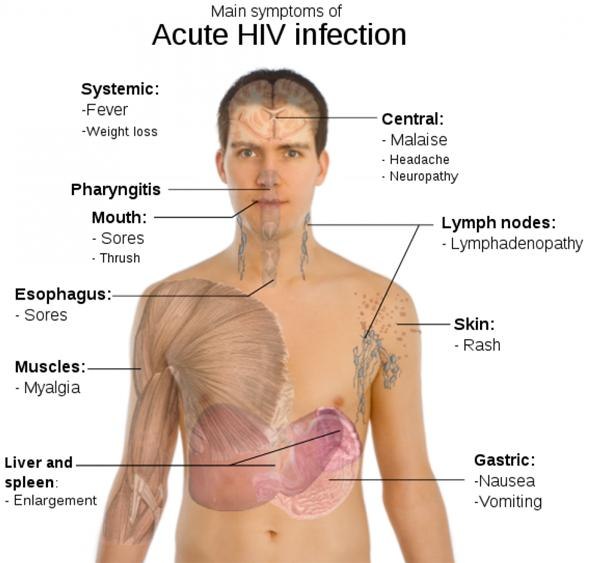
Treatment: There is no vaccine for the prevention of HIV. It can be treated and managed with the use of antiviral medications, antiretroviral medicines, some drugs used in treating Hepatitis C and supplemental hormones when treating women.
Acquired Immunodeficiency Syndrome (AIDS)
Acquired Immunodeficiency Syndrome (AIDS) is the final stage of HIV infection. Patients do not die from the HIV infection itself or from AIDS. The significant depression of the patient’s immune system caused by the virus allows for other infections to attack the patient. AIDS actually results from untreated HIV which continues to damage and weaken the immune system. When T-cell levels dip below 200 cells per cubic millimeter of blood and/or the patient has developed an opportunistic infection, that patient has moved from HIV to AIDS.
It is the severity of the opportunistic infection and the patient’s inability to fight that infection that lead to death. When the HIV is effectively treated with antiviral and antiretroviral medications, AIDS generally will not develop in the patient.
Symptoms
Symptoms vary depending on the nature of the infection that the patient has contracted, but common symptoms include:
- Weight loss
- Excessive sweating
- Dry cough
- Persistent diarrhea
- White sores in the mouth or tongue
- Difficulty breathing
- Chronic fatigue
Treatment: There is no AIDS vaccine. AIDS is treated with antiviral medications, antiretroviral medications, and supplemental hormones for women and Hepatitis C drugs.
OSHA Required Prevention
 The guidelines laid out by OSHA for the safe handling of bloodborne pathogens and prevention of transmission of viruses and pathogens fall into five major categories. They are:
- Engineering controls
- Work practices
- Personal protective equipment
- Universal precautions
- Body substance isolation
Engineering Controls
This term refers to methods, procedures or equipment that isolate or remove the bloodborne pathogens from the environment
- Protocols for containment of infectious materials, such as freezer bags, refrigerators, etc
- Cleaning stations/lavage for the eyes, hands, body
- Protocols for control of waste disposal, including transportation
- Appropriate labeling and storage of medical tools
- Protocols for infectious material labeling and biohazard labeling
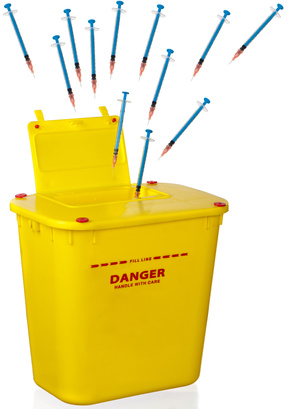 Sharp with Engineered Sharps Injury Protections (SESIP)
- Procedures for handling with retractable needles. Retractable needles should be disposed of in a puncture-resistant, leak-proof container
- Procedures for handling finger prick lancets.
- Procedures for handling needless systems including needle guards, blunted needles, retractable scalpels including disposal in a puncture-resistant, leak-proof container.
Proper recapping of needles
- Generally, needles should not be recapped, but if that is required for some reason, workers should use a one-handed scoop motion or a mechanical device. Two hands should not be used.
Injury
In the event of suspected exposure or injury from a sharp or a needle, the following procedures should be followed:
- The employer should document the injury describing exactly what happened and why exposure is suspected
- The employee should be tested for the bloodborne pathogen (this may require a succession of testing over time). Results of the blood test conducted should be shared with the patient and the medical provider should also include a written opinion.
- The patient should be counseled on safe sexual contact
- The patient should receive therapy or counseling as needed
- If the patient is a currently breastfeeding, she should stop breastfeeding until such time as exposure or infection has been ruled out or the patient has been treated.
- There must be an immediate evaluation to determine the presence of presumed illnesses.
- The health care professional who is responsible for the testing and continued monitoring of the patient must be provided information regarding how and when the exposure occurred, the nature of the work the employee was doing and their normal duties, and all relevant and up to date medical information for the employee.
Work Practices
 According to the Occupational Safety and Health Association,” Work Practice Controls means controls that reduce the likelihood of exposure by altering the manner in which a task is performed (e.g., prohibiting recapping of needles by a two-handed technique).”
Work practice controls include standards around:
- Handwashing – soap and hot water are first choice and best practice to prevent transmission of bloodborne pathogens and other infectious viruses. In the event that soap and running water are unavailable, workers may use antiseptic towelettes, or antiseptic hand cleansers followed by a thorough handwashing with soap as soon as possible.
- All medical facilities should have an exposure control plan that includes documenting exposure, a regimen of testing for infection and developing illness and counseling for safe behaviors to prevent further transmission of the pathogens.
- Workers should be trained in proper methods to decontaminate equipment and work areas.
- Workers should be trained in proper methods of labeling specimens and use of containers and secondary containers.
Personal Protective Equipment (PPE)
- OSHA standards state that for Personal Protective Equipment to meet guidelines, it must not permit blood, or other bodily fluid to touch, soak through or reach in any way the employee’s garments, mouth, skin, eyes, or other body part when in use. PPE should be chosen appropriately based on the environment, procedure or task and the kind of exposure risk that might generate for the patient.
- Personal Protective Equipment must be provided to employees at no cost by the employer. This includes the cleaning, repair and replacement of this equipment as necessary. This includes uniforms or laboratory jackets that protect the employee’s personal clothing.
- Personal Protective Equipment must be removed in the work area as defined by the context of where the exposure might occur.
- Eye protection should be used when facial exposure may occur. This would include goggles, face shields, masks and other eye protection devices.
- Gloves should be worn any time it is reasonable to anticipate contamination or exposure, including any vascular procedure.
- Gloves should be replaced any time they are contaminated or there is any sort of tear or break to the surface of the glove.
Universal Precautions
OSHA guidelines for universal precautions operate on the premise that all body fluids should be considered infected and handled accordingly. These include:
- Nasal fluid, mucus
- Sweat
- Vomit
- Blood
- Sputum
- Saliva
- Tears
- Urine
Decontamination of surfaces and equipment should include bleach solutions to kill bloodborne pathogens and other infectious viruses. For medical equipment, the solution should be 1:10. For work stations and contaminated surfaces, the solution should be 1:100.
Laundry that has been contaminated should be handled as little as possible. Workers should handle with gloves, and may need other protective equipment. It should be placed in clearly labeled bags. If the laundry is wet or there is a danger that the laundry may soak through the bag, it should be transported in leak proof containers.
When disposing of regulated waste, it must be placed in containers that are closable, labeled or color-coded, built to prevent leaking in storage or in transit, and sealed to prevent spills, leaks or other means of exposure.
Body Substance Isolation (BSI)
BSI refers to a body of practices that isolate bodily fluids to reduce the possibility of transmission of infection or disease. OSHA guidelines are designed to protect workers, and any others who may be at risk of exposure to bloodborne pathogens and other infectious materials. These practices are particularly important in emergency medical settings outside of hospital services and facilities where the medical conditions of the patient may or may not be known. BSI precautions are critical where workers and others may be exposed to blood, pericardial fluid, nasal secretions, pleural fluid, urine, saliva, phlegm, marrow, vaginal secretions, semen, cerebrospinal fluid, amniotic fluid, mucus, vomit or any other bodily fluid or secretion.
Congratulations on finishing our Basic Life Support – BLS Certification Class. Next, let’s test your knowledge.