Healthcare - CPR / AED Certification Class
 Welcome to our Healthcare CPR certification class!
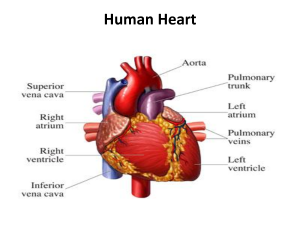
The CDC (Center for Disease Control) has issued information stating that the most common cause of death in the United States is cardiovascular disease. The risk of heart disease can be dramatically increased for patients who are obese, those who are inactive, people with high levels of stress in their lives, high levels of cholesterol, high blood pressure and smoking. These factors are all avoidable, but there are also factors which patients cannot control which can contribute to an increased risk of heart disease. These factors include a patient’s age, sex, genes and whether or not the patient suffers from diabetes of either type.
Heart disease can cause the heart to stop, and restarting the heart in good time can save the patient’s life and allow them to seek life-prolonging treatment. When a patient’s heart stops, the patient is likely to die within 10 minutes as the oxygen supply to the brain is cut off. Between six and 10 minutes after the heart stops, irreversible brain damage is likely to occur. Between four and six minutes after the patient’s heart stops, brain damage is still a possibility, but the brain can survive between zero and four minutes without oxygen with very little risk of permanent brain damage. CPR can ensure that the blood is kept moving around the body and that oxygen continues to be supplied to the brain.
CPR for 2 Rescuers
For patients without an advanced airway:
Adults and children over 12: 30 chest compressions should be performed and then two long breaths should be administered. Repeat this cycle.
Children and infants: 15 chest compressions should be performed and then two long breaths should be administered. Repeat this cycle.
For patients with an advanced airway:
Adults and children over 12, young children and infants: chest impressions should be continuously performed at a rate of between 100 and 120 compressions per minute. One breath should be performed once every six seconds.
When to stop CPR
You should only stop CPR under the following circumstances:
- You are in danger
- A pulse is regained
- The patient’s heart has been stopped for more than half an hour
- You become exhausted and cannot continue
- The chest compressions rupture a lung, puncture the skin, cause significant fractures or severe bruising of the chest and ribs
Recommendation
Rescuers who are not trained in CPR should still administer chest compressions as it is very easy for them to be instructed by an emergency services operator over the phone. An ambulance should always be called as soon as possible if you find a patient in need of CPR. CPR should only be performed to buy the patient time before the emergency services arrive and qualified medical professionals are able to take over and accompany the patient to hospital.
Bloodborne pathogens to be aware of:
You should be careful of Hepatitis B and C, HIV and tuberculosis as it is possible for all of these diseases to be passed on through an exchange of bodily fluids. If there is blood in the patient’s mouth and you perform a lifesaving breath, there is a chance that a bloodborne disease they are carrying could be passed on to you. You should be aware of this at all times and you do not have to perform a breath if you do not feel safe and comfortable doing so.
Healthcare - CPR / AED Certification Class
 A version of the Good Samaritan Law exists in most countries. It was put in place in order to protect anyone who offers emergency assistance to someone in need. As long as the ‘samaritan’ is acting voluntarily without expecting to be compensated or paid for their services, they will receive legal protection when assisting someone who is ill, has suffered an injury or is immediate danger for whatever reason.
This includes offering legal protection to those who perform CPR in order to preserve life. This means that if the patient is injured in the process of you assisting them, you should not be prosecuted for having harmed them if you were doing your best to save their life.
When to Activate Emergency Response System
Wherever possible, a call to the emergency services and CPR should begin at the same time. If there is anyone else in the vicinity, ask them to call the emergency responders and retrieve the nearest AED whilst you begin to perform CPR.
If you are on your own and there is nobody else nearby to ask for help, leave the patient if you have to in order to seek help, retrieve the AED and call the emergency services.
If there are lots of people around, do not be afraid to assert your authority and ask others to perform certain tasks. Strong leadership is often required in these situations.
Understanding Duty to Act
Duty to act is the duty requiring a person to take necessary action in order to prevent harm to another person or to the general public. Whether you are required to follow through depends on the situation and the relationship between the parties. In some cases, breach of duty may put a party at liability for damages.
For laypersons, duty to act requires that you provide care if you have a legal duty. If you do not have a legal duty to provide care, you are not required to provide it.
Fear of providing care
There are a number of factors to weigh up when considering providing care. COVID-19 is an important concern, but the risk of contracting diseases can be reduced by wearing personal protective devices like masks, gloves, and gowns that limit exposure.
If you feel fear of providing care due to possible legal issues, know that rescuers who provide care without a legal duty and act in good faith are protected by Good Samaritan laws.
If the situation is actively unsafe, do not attempt care. If you or the victim are at risk, it is best to call EMS and wait for support to arrive.
In some cases, you may be unable to save a victim. Rescuers should still attempt to provide the best care they are able to. A victim’s chances of survival can be improved by even basic efforts at life support. In accidents, victims who are clinically dead may still be helped when given care. Rescue efforts will not worsen their condition.
Following a traumatic situation in which you provided care, you may experience overwhelming emotions. If you continue to feel symptoms like depression, be sure to seek help from a professional source.
Healthcare - CPR / AED Certification Class
Step 1 – Safety
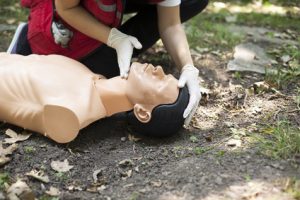 Check the environment to make sure that you are not putting yourself in danger by helping the patient. If it is safe to approach, check to see if the patient is responsive.
Step 2: Pulse Check
Place two fingers on the side of the patient’s neck, up against the windpipe. Press firmly for between five and 10 seconds to feel for a pulse. You can also try placing two fingers between the two wrist bones to find a pulse.
C is for Circulation
Adult and Adolescent Compressions
Circulation
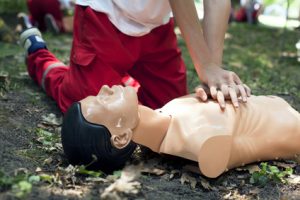 When the heart stops beating, blood stops flowing around the body. Chest compressions work to artificially stimulate the heart, helping it to pump blood around the body.
The patient should be laying flat on a solid surface usually the floor. The rescuer should place one hand on top of the other, and place the base of the palm toward the base of the patient’s sternum. The rescuer should then lock their elbows and position themselves above directly over the patient. They should then use their own body weight to compress the chest of the patient in a rhythmic fashion. The chest should compress at least a minimum of two inches, and the healthcare provider performing the compressions should ensure that they remove their full body weight in between each compression in order to let the heart refill with blood. For an idea of rhythm, try matching the beats of the song “Staying Alive” in your head. Try to be consistent in the timing and rhythm of the compressions, and do not stop for more than 10 seconds if at all possible.
Chest compression fraction
Chest compression fraction is calculated as the percentage of the time spent performing CPR during a cardiac arrest. Interruptions, whether intended or not, should be kept to a minimum so that the chest compression fraction (ie the time spent attempting to resuscitate the patient) does not fall below 60%.
Should you perform chest compressions on a pregnant woman?
Yes, if she goes into cardiac arrest. If the woman’s baby bump is at or above the umbilicus, chest compressions should be performed with one hand whilst the rescuer pushes the uterus to the patient’s left-hand-side with the other hand.
Should you perform chest compressions on an obese patient?
Yes, you should if they are in cardiac arrest and require CPR.
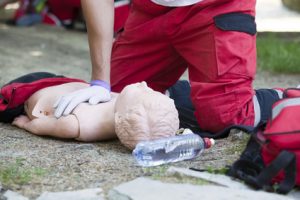
A is for Airway
Clearing the airway
Make sure that the patient is lying on their back on a firm surface eg. the floor. Kneel down beside them at the height of their shoulders. Tilt the head back slightly by placing your palm on their forehead and lift the chin upwards with the other hand. Place your ear close to their mouth to listen for breathing and watch the chest for any movement. If you cannot hear, feel or see their breathing, mouth-to-mouth is required.
Jaw-Thrust Maneuver:
To perform a jaw-thrust, kneel behind the patient’s head. Place your elbows on the floor either side of the patients head. Put one hand on either side of the patient’s lower jaw. Squeeze your forearms to keep the patient’s head stable in place. Place your index fingers along the jawline and use the thumbs to roll back the lower lip. If there are still no signs of life, start to perform mouth-to-mouth.
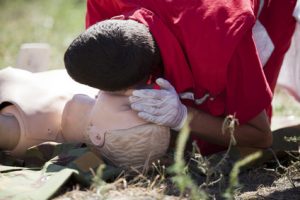
B is for Breathing
Rescue breaths, or mouth-to-mouth, are used to artificially introduce oxygen into the patient’s bloodstream when they have stopped breathing. This ensures that oxygen can be delivered to the brain and other vital organs to lower the risk of brain damage if the patient is successfully resuscitated.
Pinch the patient’s nose to form a tight seal. Place your lips over the whole of the patient’s mouth, so that your lips are sealed against theirs. Breathe deeply into their mouth, until you see their chest start to rise. If you cannot see the chest rise, the mouth-to-mouth is not being performed correctly and you may need to try again. Once you see the chest rise, perform another rescue breath before continuing with compressions.
Compressions should be continued at a rate of 120 per minute. If there are two of you, one breath should be given every 6 seconds. If you are on your own, aim to give two rescue breaths for every 30 chest compressions.
CPR on obese patients
Yes, perform Chest Compressions
CPR on pregnant patients
Yes, perform Chest Compressions and a modification if the pregnant woman’s fundus height (baby-bump) is at or above the level of the umbilicus. If the woman’s fundus height is at or above the umbilicus, then High-quality CPR with manual left uterine displacement will be beneficial for relieving aortocaval compression during, the chest compression task. To perform manual left uterine displacement: push the uterus to the patient’s left side with 1 hand while still providing CPR.
Oxygenation and airway management should be prioritized during resuscitation from cardiac arrest in pregnancy because pregnant patients are more prone to hypoxia.
Fetal monitoring should not be undertaken during cardiac arrest in pregnancy because of potential interference with maternal resuscitation.
CPR for opioid poisoning
1. Suspected opioid poisoning
- Check for responsiveness
- Shout for nearby help
- Activate the emergency response system
- Get naloxone and an AED if available
2. Is the person breathing normally?
If yes, prevent deterioration:
- Tap and shout
- Open the airway and reposition
- Consider naloxone
- Transport to the hospital
Continue assessing responsiveness and breathing.
If no, does the patient have a pulse? Assess for 10 seconds.
If yes, support ventilation:
- Open the airway and reposition
- Provide rescue breathing or bad-mask device
- Give naxolone
If no, start CPR:
- Use an AED
- Consider naloxone
- Use high-quality CPR
Rescuers should always avoid:
- Compressions at a rate slower than 100 per minute or faster than 120 per minute
- Compressions which are less than two inches deep or more than two and a half inches deep
- Leaning on the patient’s chest in between compressions
- Interrupting compressions for more than 10 seconds
- Administering more than two rescue breaths for every 30 compressions
Healthcare - CPR / AED Certification Class
 For the purposes of CPR, a child is classed as anyone between the age of one and puberty.
If you witnessed the collapse of the child taking place, you may follow the same steps as you would with an adult or an adolescent patient. Check the airway, pulse and look for signs of breathing.
If you did not witness the collapse of the child, but instead have found them in a collapsed condition, start with two minutes of CPR after checking for vital signs. After two minutes, if you are on your own, then leave the patient to retrieve an AED and to make an emergency call. Then return to the patient ASAP and continue with CPR until the response team arrives. If you are with someone else, these steps can happen simultaneously.
Step 1 – Safety
First check that you are in no danger by approaching the victim to help.
Step 2 – Vital signs
In the same way that you would for an adult, lay your ear against the child’s mouth to listen and feel for any signs of breathing. Watch for signs that the chest is moving and check the neck and wrist for a pulse.
C is for Circulation
Performing chest compressions on a child.
Chest compressions on a child serve the same purpose as they do for adult patients. The idea is to keep the blood pumping throughout the body in order to allow oxygen to continue to reach the brain and other vital organs. It is up to you to decide whether to use one hand or two in the case of a child. Small children may only require one hand, but for older children you may still need to use two hands.
Place your one or two hands on the base of the sternum. Remember to lock your elbows and use your body weight to compress the chest, taking care not to lean on the patient’s chest in between compressions so that the heart may refill with blood. Do not interrupt the compression for more than 10 seconds at a time.
You should maintain an even and fast rhythm. Try working in time to the beat of ‘staying alive’ in your head. If you are on your own, you should perform 30 compressions followed by two rescue breaths and repeat this cycle until the emergency team arrive. If there are two of you or more, the rescue breaths can be given over the top of the compressions with two breaths being given every 15 compressions.
Ensure that the child is lying on a flat surface with enough space for you to kneel beside them. It may be easiest to place them on the floor if they are not there already.
A is for Airway
 Kneel beside the child at their shoulder level. Follow the same steps to check the airway as you would with an adult patient. Support the head and tilt the chin upwards while you listen and feel for breathing. Look down the length of the child towards their toes to watch for the chest moving. You only need to check the breathing for up to 10 seconds before moving on to provide help.
B is for Breathing
If there are no signs of life from the child, you should move onto giving mouth-to-mouth (also known as rescue breaths). Follow the same steps as you would for an adult patient, but remember that children’s lungs have a smaller capacity than adults, so you will not need to breathe quite as hard or as long.
Squeeze the nose tightly shut to form an airtight seal. Place your lips over the child’s lips and breathe deeply into their mouth. If the chest doesn’t rise, check the airway again and repeat. Once you see the chest rise with the rescue breaths, continue the chest compressions cycle of 30 compressions to two rescue breaths.
Compressions should be continued at a rate of 120 per minute. If there are two of you, one breath should be given every six seconds. If you are on your own, aim to give two rescue breaths for every 30 chest compressions.
Rescuers should always avoid:
- Compressions at a rate slower than 100 per minute or faster than 120 per minute
- Compressions which are less than two inches deep or which compress more than half of the depth of the chest
- Leaning on the patient’s chest in between compressions
- Interrupting compressions for more than 10 seconds
- Administering more than two rescue breaths for every 30 compressions
Healthcare - CPR / AED Certification Class
 For the purposes of CPR, an infant is classed as a child under the age of one, but CPR is not recommended for newborns.
If you did not witness the collapse of the infant, but instead have found them in a collapsed condition, start with two minutes of CPR after checking for vital signs. After two minutes, if you are on your own, then leave the patient to retrieve an AED and to make an emergency call. Then return to the infant ASAP and continue with CPR until the response team arrives. If you are with someone else, these steps can happen simultaneously.
Step 1 – Safety
First check that you would not be putting yourself in danger by approaching the victim to help.
Step 2 – Vital signs
In the same way that you would for a child, lay your ear against the infant’s mouth to listen and feel for any signs of breathing. Watch for signs that the chest is moving. Instead of looking for a pulse in the wrist and/or neck, place your second and third fingers against the inside of the upper arm, halfway between the armpit and the elbow. This is a better place to check for a pulse on an infant.
C is for Circulation
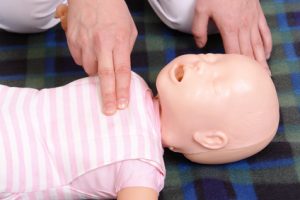
Compressions on an infant.
Ensure that the infant is resting on a solid, flat surface. It may be easier to have them on a table or a raised flat surface rather than on the ground as you would with a child or an adult patient.
Do not use your whole hand when performing CPR on an infant patient. Find the center of their chest, slightly below the nipples. Place your index and third fingers together in the center of the chest. Perform the compressions using these two fingers. The chest should compress by about one-third of its depth.
You should maintain an even and fast rhythm. Try working in time to the beat of ‘staying alive’ in your head. If you are on your own, you should perform 30 compressions followed by two rescue breaths and repeat this cycle until the emergency team arrive. If there are two of you or more, the rescue breaths can be given over the top of the compressions with two breaths being given every 15 compressions.
A is for Airway
Ensure that the infant is lying on a firm, solid surface. Kneel close to the infant’s shoulder, or stand beside them leaning over their head. Place one hand on the top of the head and use the fingers on the other hand to gently raise the chin. Place your ear next to their mouth to listen for any sounds of breathing. You may be able to feel breath instead, or see the chest rising and falling in time with the breathing. If you do not see, hear or feel any signs of breathing for 10 seconds, CPR should commence.
B is for Breathing
Performing mouth-to-mouth on an infant.
Breathing into the mouth of an infant is different to performing rescue breaths on an adult or child. To administer a rescue breath to an infant, place your mouth over their mouth and nose, forming a tight seal against their skin with your lips. You do not need to breathe as deeply as you would for an adult or an older child. Only breathe in for one second, and watch to see the chest inflate as you do so. If the chest does not rise fully, there may be something blocking the airway. Check by looking into the infant’s mouth for any foreign bodies which may be causing an issue.
Once the rescue breaths have been performed, continue with the chest compressions.
Compressions should be continued at a rate of 120 per minute. If there are two of you, one breath should be given every six seconds. If you are on your own, aim to give two rescue breaths for every 30 chest compressions.
Rescuers should always avoid:
- Compressions at a rate slower than 100 per minute or faster than 120 per minute
- Compressions which are less than one inch deep or more than one and a half inches deep
- Leaning on the patient’s chest in between compressions
- Interrupting compressions for more than 10 seconds
- Administering more than two rescue breaths for every 15 compressions
Healthcare - CPR / AED Certification Class
 Choking is a condition which occurs when a piece of food or an object blocks the throat or windpipe and prevents the patient from being able to breathe properly. Adults are most likely to choke whilst eating if they mis-swallow a larger piece of food, but children often place items in their mouth and are more likely to choke on small toys or moving parts.
Adults who are choking will often draw attention to themselves and try to seek help. The recognized sign for choking all over the world is for a person to mime choking themselves and pointing to their throat. This is usually only necessary if the object is fully blocking the windpipe. In many cases, patients will still be able to cough and sometimes even speak in a breathy tone. If the patient passes out due to choking, be sure to call an ambulance immediately. They could well need medical intervention in order to remove the object.
Infants under the age of one
If you are treating a baby who is choking, the best practice is to sit down and to place the child face down and balance them along the length of your forearm. Place your arm and the baby on top of your thigh. You should then administer five hard thumps with the base of the palm of your hand in an upwards motion on the patient’s back. If this does not dislodge the object, turn the child over and use two fingers to perform five quick chest compressions.
Children and Adults
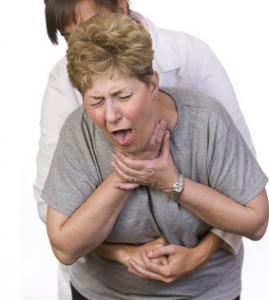
The Heimlich maneuver is a procedure used on children and adults to help dislodge a foreign object from the throat or windpipe. The rescuer should stand behind the patient and lean them slightly forward. They should then wrap their arms around the patient’s waist, pushing the fist of their dominant hand into the choking person’s abdomen with the other hand closed on top. Perform quick, hard thrusts upwards. Repeat cycles of five thrusts until the item is dislodged or until help arrives.
Unconscious patients
If you have witnessed the person choking and they have collapsed and passed out due to a lack of air, lay the patient on their back and see if you are able to remove the object using your fingers to swipe the mouth for foreign bodies. Ask someone to call 911 while you work. If you can’t see or feel anything in the patient’s mouth, begin CPR to keep the blood flowing around the body. Chest compressions often exert enough forge to dislodge items from the airway and allow the patient to begin breathing normally again. Continue the chest compressions until the patient comes round or until help arrives.
Hypothermia
Hypothermia is a condition which occurs when the body’s temperature falls to below 95ºF. It is a condition which occurs when the patient’s body starts to lose heat faster than it can generate enough energy to warm itself up. Hypothermia can occur when a person is submerged in cold water. The nervous system can shut down fairly quickly and brain and organ damage can start to set in relatively quickly which can be fatal.
Treatment
If you suspect that the patient is suffering from hypothermia, be sure to call for medical help as soon as possible. Hypothermia can be treated by firstly ensuring that the patient is wearing warm and dry clothes. Compressions and rescue breaths should be administered if the patient has lost consciousness. If the patient is conscious, try to make them drink a warm drink, and warm them up gently and not too quickly. Don’t apply direct heat to the patient’s skin.
External Dehydration
Dehydration can happen when people exercise too vigorously without drinking enough water. It occurs when the body loses water more quickly than they are taken in. If the fluids aren’t replaced quickly and in high enough quantities, dehydration can occur.
Treatment for dehydration
The patient should drink fluids which are rich in electrolytes. Sports drinks, rehydration sachets, coconut water and diarrhea solutions are all good options. If the dehydration is acute then the patient may have to be admitted to hospital to have fluids administered through an intravenous drip.
Healthcare - CPR / AED Certification Class
Fibrillation
 Ventricular Tachycardia
This condition occurs when the patient has a rapid heartbeat, beginning in the base of the heart in the ventricles. These are the main chambers in the heart which fill with blood and pump to deliver blood around the body. If the heart continues to beat too fast, complications can arise and damage can be done to the body’s vital systems.
Ventricular Fibrillation
This condition occurs when the muscles in the heart begin to quiver instead of contracting. It is a serious condition which requires immediate medical attention. If the patient does not receive treatment the blood can cease to circulate around the body causing vital organs to shut down. After just 4 minutes, serious and irreversible brain damage can be caused and after eight minutes, the patient is likely to die.
Automated External Defibrillator (AED)
When should an AED be used?
CPR is a vital action which as the power to make the difference between life and death. However, advancements in medical technology are also able to help patients in cardiac arrest. AEDs can be used to bring the patient’s heartbeat back into a natural rhythm. The emergency services should always be called before you use an AED as they are able to talk you through the necessary steps.
How to use an AED
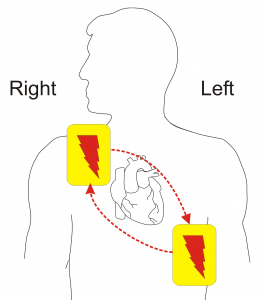
 The first step is to witch the AED on. You will usually find an on button somewhere obvious, but occasionally there is a lever which needs to be pulled to activate the machine. All of the clothing should be removed from the patient’s upper half so that the skin is accessible. The pads of the AED should be attached to the bare skin on the patient’s chest. There will usually be a diagram in with the AED to show the location of where these pads need to be positioned. The left pad should be attached underneath the left armpit and the right pad should be placed underneath the collarbone on the right-hand side of the chest. The pads should be placed at least an inch away from devices which have been implanted into the patient.
Connect the wires carefully and make sure that everyone is standing back from the patient and avoiding any contact at all whilst the AED performs its analysis. If the analysis does not start when you connect the wires, click the analyze button to kickstart the process. When the machine instructs you to shock the patient, click the shock button whilst making sure to avoid all contact with the patient.
For Infants
AEDs are programmed to read the vital signs of each individual patient. It will, therefore, be able to determine the right shock to administer to a small infant. In the case of young babies, it is sometimes necessary to place one of the patches on the baby’s front and one on their back. If the pads are less than an inch apart when both are placed on the front, move one over to the back of the infant.
Special circumstances for resuscitation
Drowning
If a patient is unconscious following a near drowning, their wet clothing should be removed immediately and replaced with warm, dry garments or blankets. Rescue breaths should be given as soon as possible and a cycle of CPR should be given.
Trauma
Check for external and internal injuries such as damage to the head, neck, spinal column and any internal bleeding. The airway should also be checked carefully using the jaw thrust maneuver to ensure that no foreign bodies or dislodged teeth are stuck.Whilst performing CPR following trauma, rescuers should do their best to avoid exacerbating any injuries, but this should not come in the way of compressions or rescue breaths.
Electrocution
Make sure that you check the surrounding area for your own safety before you touch the patient or begin to perform any medical procedures. The patient may be unconscious as a result of an electric shock. If this is the case, and the electrical current is still live, there is a possibility that the shock could be administered to the rescue to if contact is made with the patient’s body. Always double check that there are no live wires or fuse boxes in contact with the body before touching them. Once you have checked the area and made sure it is safe, you can begin CPR.
Healthcare - CPR / AED Certification Class
Before performing any procedures on the patient, first speak to them, reassure them and ask them to respond if they can hear you. If they do not make any effort to respond, check their airway before checking for signs of breathing.
Chest compressions should be performed at a rate of 30 compressions for every two rescue breaths. Continually check for signs that the patient is breathing on their own and feel free to stop and check for a pulse, as long as the interruptions to the compressions do not last more than 10 seconds.
CPR for infants
- Call 911 if you witness a collapse
- If you find the infant unresponsive, start CPR and perform for two minutes before leaving to call the emergency services
- Check for a pulse and signs of breathing
- If the patient is not breathing, check the airway and begin CPR
- Chest compressions should be performed at a rate of between 100 and 120 compressions a minute
- Compress the chest by around one and a half inches, a depth of one-third of the depth of the chest
- Two rescue breaths should be given for every 30 compressions
- Use two fingers to make the compressions rather than the whole hand
- Use an AED as soon as it becomes available
CPR for children
- Children are defined as being over the age of one and not having hit puberty yet
- Call 911 if you witness a collapse
- If you find the infant unresponsive, start CPR and perform for two minutes before leaving to call the emergency services
- Check for a pulse and signs of breathing
- If the patient is not breathing, check the airway and begin CPR
- Chest compressions should be performed at a rate of between 100 and 120 compressions a minute
- Compress the chest by around one and a half inches, a depth of one-third of the depth of the chest
- Two rescue breaths should be given for every 30 compressions
- If there are two rescuers, two breaths can be given for every 15 compressions
- Use two hands on top of each other to make the compressions
- Use an AED as soon as it becomes available
CPR for adults and adolescents
- Call 911 if you witness a collapse
- If you find the infant unresponsive, start CPR and perform for two minutes before leaving to call the emergency services
- Check for a pulse and signs of breathing
- If the patient is not breathing, check the airway and begin CPR
- Chest compressions should be performed at a rate of between 100 and 120 compressions a minute
- Compress the chest by around one and a half inches, a depth of one-third of the depth of the chest
- Two rescue breaths should be given for every 30 compressions
- Use two hands on top of each other to make the compressions
- Use an AED as soon as it becomes available
Congratulations on finishing Healthcare CPR Certification Class. Next, let’s test your knowledge.